I'm dropping in to make official what was probably obvious awhile ago: I'm done with this ole blog. There are probably a couple of spambots who will be sad, and I'm sorry, bots. I really am.
I started this blog over 6 years ago, when my kids were small and numerous and I needed an outlet to preserve my sanity. My family outgrew this blog a few years ago, and by that I mean that my children aged (imagine! I didn't see that happening) and their stories were...their own stories. Sometimes I can tell their stories, but by and large they are their own awesome people, learning and stumbling along with the rest of us. Baby stuff on the internet isn't such a big deal; second grade failures and triumphs are private.
Plus, once I curbed the kids' stories, I was left grasping for content, and Keeping Up with the Cases started to feel like an unfun obligation. Who needs that? Life is busy enough. Here's a lesson: No matter how sad it might seem, prune what feels like an unfun, unnecessary obligation. My blog did its job, and now I'm cutting ties. Plus the Kardashians crashed my party and made me look like a copycat, even though I was here first.
I stopped my domain name because I'm cheap, so now you'll have to type in "blogspot dot com" to get here. Why do you need to get here? I, myself, am running away and never looking back. I'll eventually shut down comments and close down the email account.
My husband asked that I include a shameless plug for him here, too. He's on the sidebar, too, but just as a reminder, you can find him here and keep up with his own musings, book reviews, photos, and such. He is in the middle of writing a novel, and it's not a dopey self-published one, either. He is under contract with a publisher and has an editor and everything! It's pretty exciting times. You should keep up with The Professor. Just make this one small trade, one Case for another.
In closing, thanks and much love and congratulatory butt-slaps to any long-term followers reading this. You stuck it out! Six years is an ETERNITY on the Internet. Consider me impressed!
For the time being, I'm still on Instagram as "casemama" (not linking because that also sounds unfun, and in the dead of winter I need to shed all the unfun I can, folks), or at least until I'm not. The Internet makes us an easily-bored people.
Love to your mother, fool.

Erectile dysfunction is a very common problem among men of all ages, the problem is better described as the physical inability to maintain a prolonged erection. There are several causes which are said to trigger erectile dysfunction however, most of them are directly related to the circulatory system and changes in our brain. By definition erectile dysfunction is a physical condition where a man can not maintain an erection in order to have intercourse, at some point or another. Most men report to have had problems related to their erections at least 25% of the time, and even if happens only 25% of the time this is still considered to be an erectile dysfunction problem. Let's establish some of the causes of erectile dysfunction: - https://vgruk.com/ Circulatory problems and penis enlargement pills: Men who suffer of circulatory problems are most likely to have sexual problems related to their erections due to the fact that erections can only be achieved if a person has a healthy circulatory system, which obviously starts at a healthy heart. Besides having heart problems, those patients who have cloaged arteries, high blood pressure, diabetes, obesity or even suffer of a metabolic syndrome are very likely to have an erectile dysfunction problem. Men who suffer mental problems such as depression or any other illness related to the brain are very vulnerable of suffering of the condition in question. With so many possible causes, pharmaceutical companies have come up with an idea to solve the most obvious and treatable problem, and circulatory and blog related problem that is. Penis enlargement pills work by increasing the blood flow towards a man's genitalia in order to create longer-lasting and fuller erections, they work by driving a higher amount of blood towards soft tissue which is forced to stretch under the new conditions, since penis enlargement pills target the blood related problem at its root, they are set to help people suffering from direct tile dysfunction. While penis enlargement pills temporarily solve the problem, the are not recommended to people who have severe circulatory problems, such patients are recommended to contact their physician before using prescription or nonprescription pills intended to treat circulatory related problems.
Tuesday, January 13, 2015
Wednesday, July 23, 2014
The Kitchen: Where We Stand Now
When I last updated you on our kitchen remodel, we had a floor in, were done with the major construction work, and were waiting on cabinets and a sink. Today I'm going to show you just where we are right at this moment in time, give or take a few photos that I accidentally slipped in that feature a plywood countertop. (If you see that bad boy, just squint and pretend it's not there.) We are by no means finished and are looking at a few more months of slow and steady work (and slow and steady saving of money, because CASH), but we do have a completely functional kitchen that is already looking miles better than the original.
So after the floors were done, my father-in-law came to our house for a week and worked with my husband on bringing the kitchen to a usable point of existence. This meant installing the sink, faucet, and plumbing, getting in all the cabinets, and installing doors and drawers. This also meant building a fridge enclosure, as well as my father-in-law, who is a carpenter, cutting all of our butcher block countertops for us so that we could stain, seal, and install them later. They got all that work done in great time and did a brilliant job. If you know them and see them at any point, give them a few congratulatory butt slaps for a job well done.
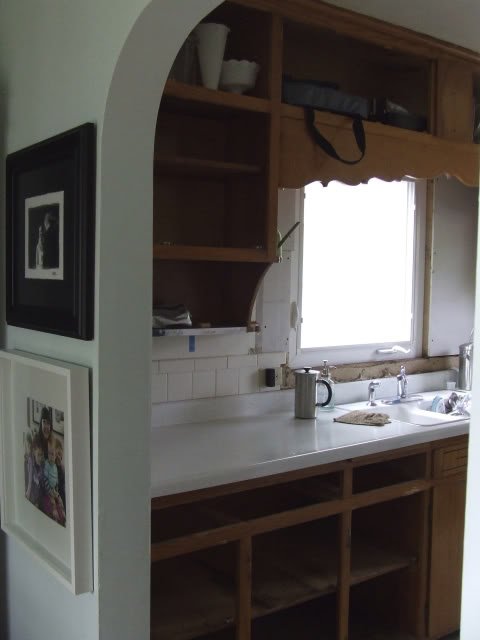
Because I like high drama kitchen reveals, here's a reminder of what it looked like when we moved in during March of 2008:
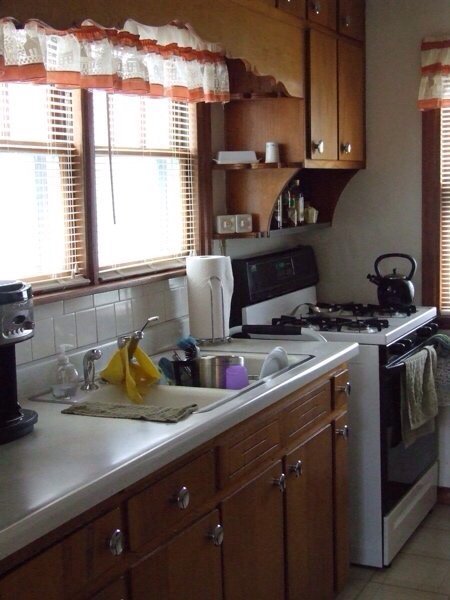
The dusty ruffled valances and mini blinds really sealed the whole home purchase deal for me.
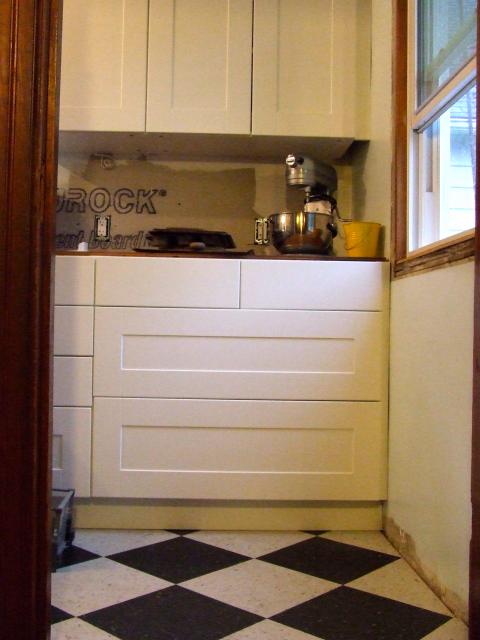
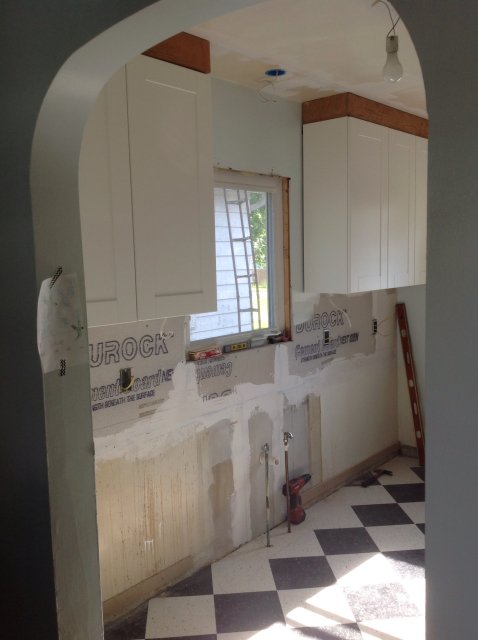
As of right this moment, this is my kitchen:
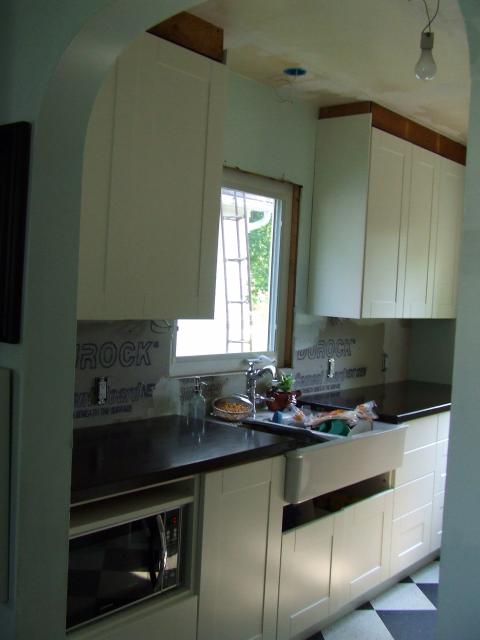
I know, right? Turn your head and look at the other side.
Sorry for the awkward angles. It's a galley, you guys. It's lovely, but it's still tight.
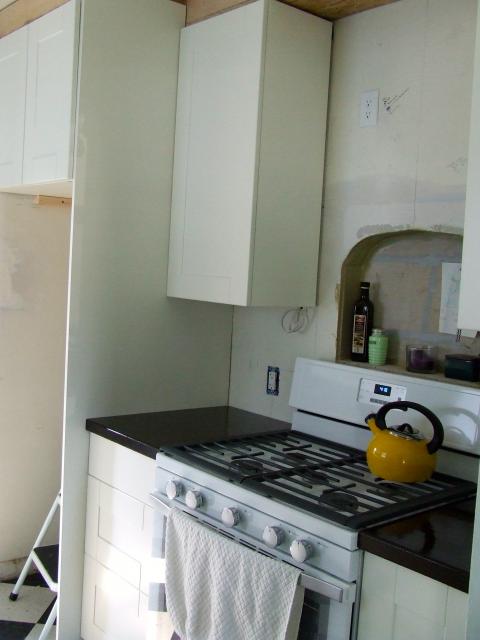
If you are an observant person, you might notice that we moved the range and somehow lost a fridge. More on the fridge later, but yes, we moved the stove. We needed the magical kitchen triangle to be closer than it originally was, and we were sick of having a window next to a stovetop. We are the royal family of open windows, and we were sick of our coveted afternoon breezes blowing out the gas burners. Plus the window at the end of the galley faces south, which means hours of fresh, hot sunlight pouring on whichever poor soul was destined to cook at the oven in the evenings. (That would be me.) So our contractor moved the gas line and put in all the necessary equipment for a range hood (WHICH WE'VE NEVER HAD, OMG, YOU MEAN I WON'T HAVE TO SWEAT OUT OF THE TOP OF MY HEAD IN ORDER TO PREPARE A MEAL NOR DEAL WITH THE ODOR OF A THOUSAND DINNERS SEALING THEMSELVES IN THE WALLS OF MY HOME, WHAT WITCHCRAFT IS THIS??!!) and then, AND THEN, I said, "Hey, can you do a wall niche?"
All casual-like, as if I ask for niches from talented professionals ALL THE DANG TIME.
I got me a wall niche.
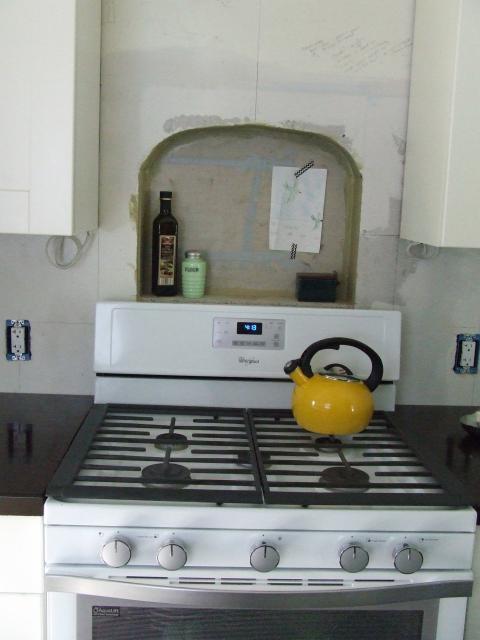
I will probably say this about 649 other things before this blog post is done, but that wall cut-out might be my favorite thing in this room. It's certainly my favorite a-ha! moment that came from my very own brain pan. After we demoed but before our contractor arrived, I was just standing around, reminding myself that it would all be worth it (*sob*) and then I turned toward this blank wall and BAM Jesus hit me with this amazing idea: You are going to have to tear out the walls anyway, woman. Why not use that to your advantage and look like a kitchen from a magazine?
Thus the idea for Wall Niche was born.
Only after Jesus hit me with this amazing idea did I turn to Pinterest and find inspiration photos to show the contractor, who is a total genius and completely caught my vision AND THEN hit me with this other amazing Jesus-given thought: "Instead of making it a rectangle like most of these you see, why don't we round out the top and make it an arch that mimics the arched doorways in your home?"
I do not want to be flippant about our Christ, but man, He was working niche miracles that day. Along with our contractor, who took notes on how high and wide I was thinking, broke into that wall, worked around and built up the studs, and just did an amazing job with it. He gets a million points to Gryffindor for that built-in ALONE.
(I should note that all of the drywall on this side, including the niche, will be tiled. It's bare now, obviously. This is another time where you need to squint and imagine.)
Just above the miracle niche, in between the two upper cabinets, is where we're all prepped for a built-in exhaust fan:
Instead of going with a naked stainless hood, we are going to use a model that requires a custom-built cover so that it looks like just another cabinet, painted white and all. I'm not really a stainless fan, and I like the idea of as little interference on this small wall of cabinets as possible. Here's a possibility:
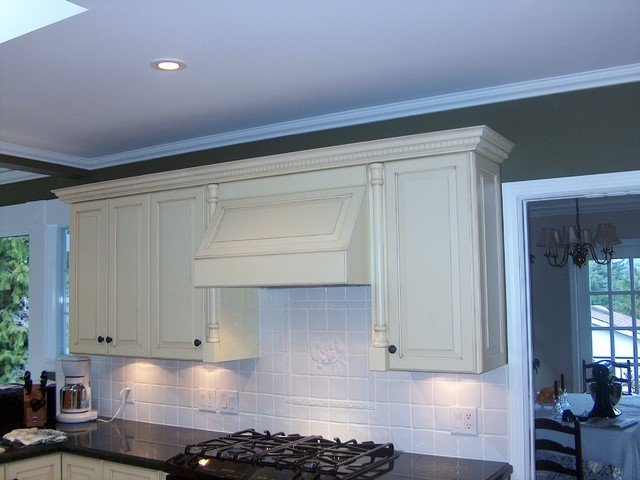
I literally just googled that right now because I am too lazy to sign into Pinterest and find the actual 300 range hood posts I have saved, but you get the idea. We're holding off on the range hood and surround because we need to save up for that project. I don't know if I've mentioned this, but dang, remodeling a kitchen from scratch is expensive. Did you know that? Well, now you do.
Just to keep it real, here's a picture of the actual light we are using in this room:
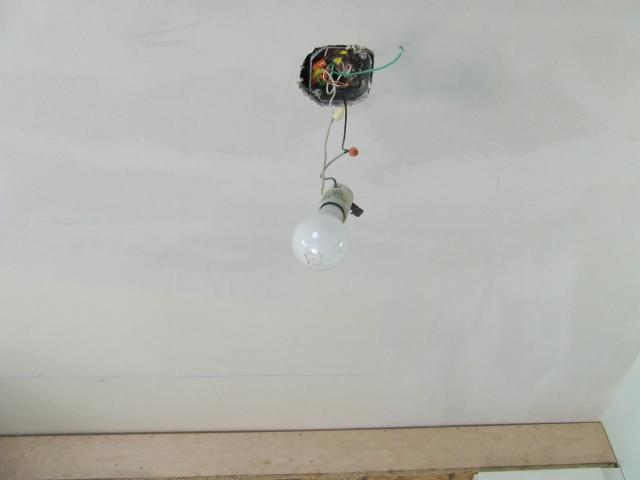
Believe it or not, it's still better than what we had before. By the time this is all done, we'll have two semi-flush mount schoolhouse fixtures on the ceiling, a pendant over the sink, under cabinet lighting all over the place, and lights built into the range hood. But I am planning a special thing for my ceiling that forces us to hold off on lights for now. I'm keeping quiet about that at the moment. For now, bare bulb dangling from the ceiling is our jam.
Something to note: You may have noticed the soffits the men built up on top of the wall cabinets. These serve a couple of purposes. The soffit above the wall we're looking at, the stove wall, conceals the duct work for the range hood ventilation. (It vents out the side of the house, to the left, which is the back side of our home.) The soffits also will serve as a place for trim and crown molding. I wanted my cabinets to go all the way to the ceiling for as built-in a look as possible. I really think that finishes a kitchen, and the idea of a few inches of space just gathering dust above my food prep areas fills me with ick. Ikea wall cabinets are supposed to be hung something like 5" from the ceiling (plus we have old plaster walls, so who knows how level everything is?), so the soffits fill in that gap and will eventually get covered for a faux built-in look. Make sense?
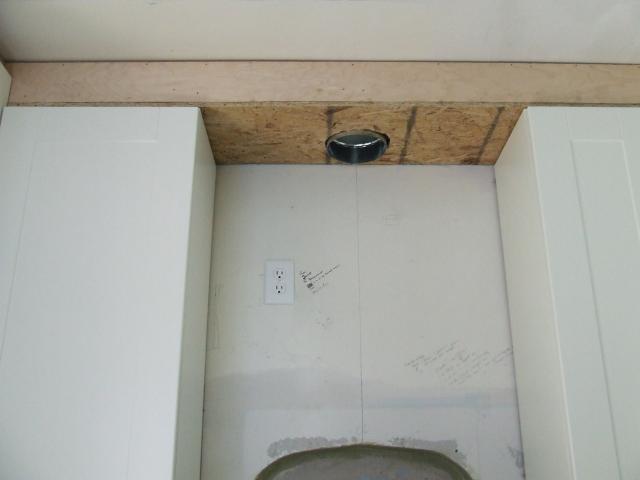
Moving on to the fridge. I decided to NOT plan our current fridge into this design because it is a) 15+ years old and b) too big for our space. It's a perfectly functional Whirlpool that works great, but I couldn't get cabinet configurations to work with its two-door, 34" self. It's just too big for the room. So we moved it to the basement and it is now officially called Basement Fridge and that's what we are using for now. Why, you ask? Well, because the 30" fridge that I want is expensive and I am also saving up for that. For now, we have a perfectly proportioned space just waiting for it.
If you look carefully in that enclosure, you can see the drywall patch from what used to be the only light switch in the room. Because walking all the way to the end of the room, sticking your hand in the dusty space in between the fridge and the wall, and groping for a light switch/outlet plate (why the outlet? no one ever knew) made SO MUCH MORE SENSE than just having switches in reasonable places. Now we can turn our bare dangling bulb on and off from two places in the room, just like rich people.
Here's another angle of the enclosure:
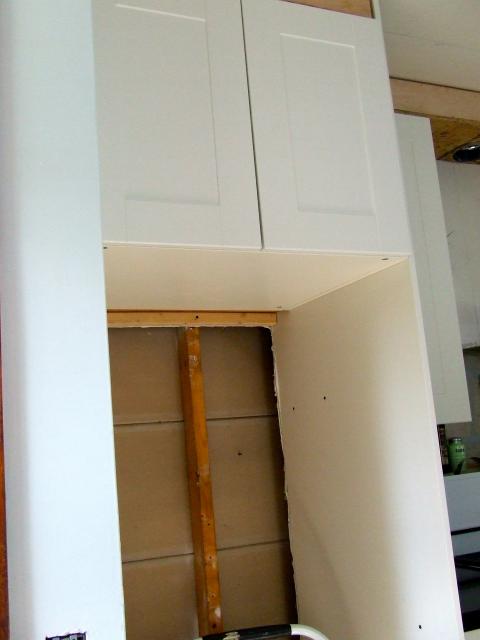
In case you're looking for specifics, that's a 24" X 24" X 30" over-the-fridge Akurum cabinet. It's built out just slightly so that it, combined with the panel on the right, will cover the refrigerator COMPLETELY and only show the barest amount of huge, looming appliance. I can't afford a cabinet depth refrigerator, either money- or width-wise, so I'm going to fake it as best as possible with a standard depth fridge. Our contractor was a genius who suggested we pull out the plaster in between the studs for appliance ventilation, thus giving us a few inches off the depth dimensions. We're just fine using Basement Fridge for the time being, but I know this will all look great when it's got a real, actual Main Level Fridge filling it out. (We'll still keep Basement Fridge! We love you, Basement Fridge.)
Jump to the right of the stove and you'll get a taste of how great Ikea's cabinet options are for space-crunched kitchens. Here we have what looks like an innocent, 15" lower cabinet door…
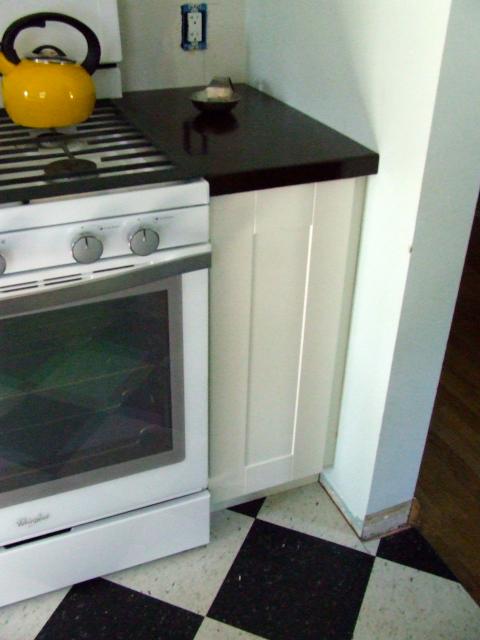
…but open it up and *gasp!* it actually turns out to be a 15" pull-out cabinet with two narrow drawers built into its top!
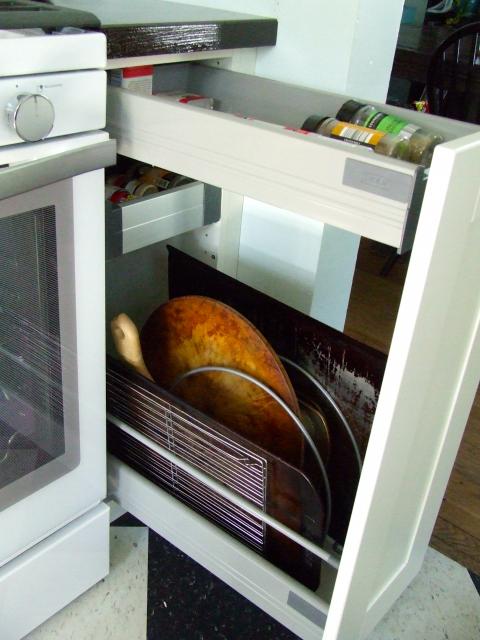
Kroger and Aldi spice containers represent!
I bought a thing from Ikea that helps hold up cookie sheets and what-not, and this is a PERFECT amount of space for me. For now I'm putting spices in the wee drawers. I know some people would fret about them being next to heat, and I'll take that into consideration, but for now I actually really like them here. They aren't toppling over one another in an upper cabinet, and since I'm a shortie with short legs, having them looming over me in an upper cabinet doesn't really make much sense anyway.
To the left of the stove on the bottom is a three-drawer unit that I completely forgot to photograph. Use your imagination.
Okay, let's shift our attention to the other side of the kitchen. On either side of the window on that wall are cabinets. On either side of the sink: cabinets. I squeezed as many cabinets as possible into this space, knowing it would be holding the bulk of my storage and counter space. This is another reason we moved the stove: Now I have over 8 feet of counter space just on this wall alone, as opposed to the 4 feet in the original design. If I had left the stove where it was, I would have lost out on all that glorious, nearly continuous countertop.
In this next photo you can see the cabinets to the right of the window/sink, as well as the butcher block countertop (I got it so dark, you guys!) and the window trim the men had to rip off (for now) to get the cabinets installed.
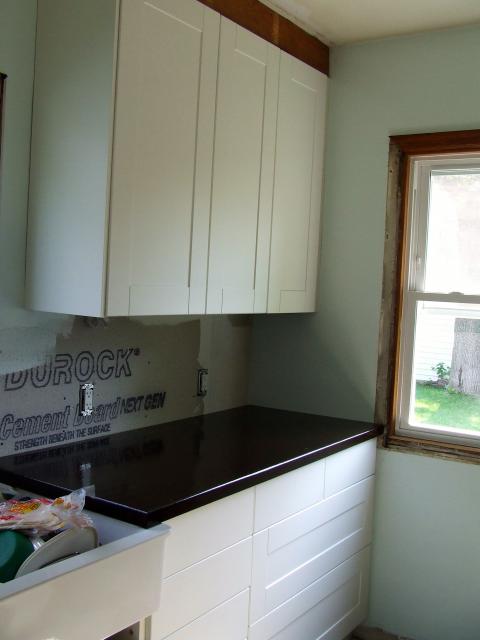
First, those countertops. Yes, they're butcher block; maple, in fact. We bought them in 8 foot sections and, as mentioned, my father-in-law expertly cut them in four pieces and routed the edges. Over the course of about three weeks, we stained them (Dark Walnut by Minwax) and then sealed them with Waterlox. I wanted dark to begin with, and boy, did I get dark. The maple just loved that stain. My only regret is that they are so dark that I lost most of the look of the wood grain, but I can deal. I like them, but yes, they are hard to keep looking perfectly clean. Don't get them this dark if you're not a fanatic like me who wipes down her counters approximately every 20 minutes. If you're looking for a more comprehensive tutorial, might I suggest looking here? Ours still need one final light sanding and oiling, but we installed them first so we could have better light than we did working on them in the garage. I can highly recommend the Waterlox, and I can also highly recommend my children's godparents, who had a bunch of Waterlox on hand and graciously let us use what they had left, thus saving us some money. Blessings on their heads.
Moving on. I don't have knobs or handles yet, so it's hard to tell just what is what in the above photo, but that lower bank of cabinets houses some of the most glorious kitchen storage known to man. When I designed my kitchen, I designed it with nearly all drawers in the lower cabinets, knowing that I would be paying a lot more money than if I just settled for standard doors or even a mixture of doors and drawers. I love drawers, you guys. They use space wisely and are far easier to clean, plus with drawers you never find yourself sitting on the floor, half of your body inserted inside the cabinet, searching for a lost Pyrex lid. (FUN FACT: Been there, done that.) I figure, hey, how often do you get to design a kitchen from scratch? Pay the few hundred dollars extra and get the dang drawers.
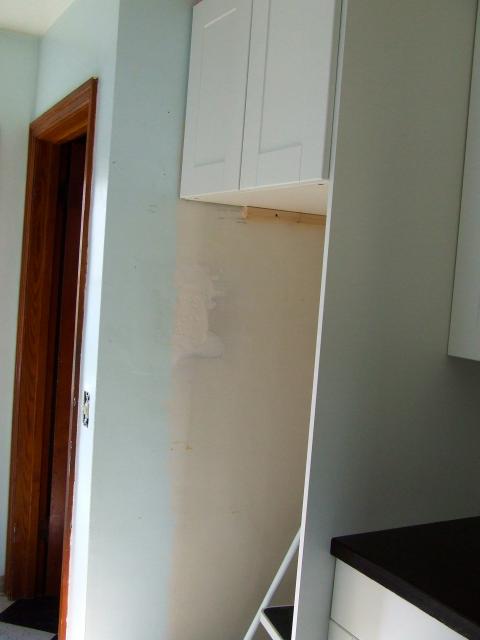
So this same lower bank of cabinets looks like this when you walk up our back stairs from the basement or back door:
The top holds ALL of my everyday dishes in pert little organizing caddies, and the bottom holds ALL of my pots, pans, and matching lids. Plus a griddle. I lined all of my cabinets and drawers with this liner and while it's indeed cute and affordable, like all shelf liner it represents a painstakingly slow job that will try your patience and make you lose your salvation approximately five times. You have been warned.
Directly next to the 36" drawer cabinet OF GLORY is an 18" four-drawer cabinet. The drawer on the bottom is a deep drawer and the other three are standards. As you can see, one of them is empty because I don't yet have anything with which to fill it. That's how awesome this kitchen is, you guys.
(That picture was taken while we were still finishing our countertops and were just using plywood.)
Next is the sink and its cabinet, which I'll feature some other time. It's the only basic lower cabinet I have, since the plumbing and some modifications we did to the sink didn't allow for the depth necessary in a drawer or pull-out. To the left of the sink is another feature that might be my favorite: an 18" pull-out cabinet that surprisingly effortlessly becomes a pull-out trash and recycling cabinet.
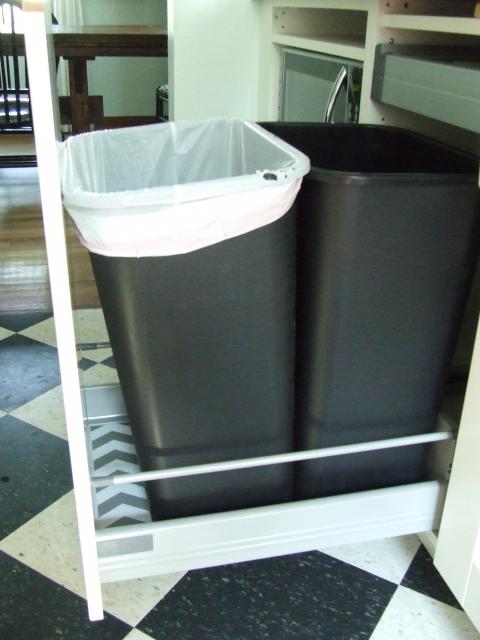
I realize this isn't perhaps as sexy-looking as a Rev-a-Shelf unit, but it works beautifully and really looks great in person. I had to measure very carefully for the containers, but these were some from Lowe's that fit well enough to allow one of those mini-drawers at the top of the cabinet. (You can see it closed in the above photo. It's our junk drawer.) I LOVELOVELOVE having my trash and recycling containers right here, and the side parts to the drawer unit hold them in just fine. One thing I was worried about was them not staying upright, since I know the Rev-a-Shelf design holds them up on their tops, but thankfully my fears ended up being unfounded. Ikea will recommend a 15" pull-out cabinet with their own plastic containers for trash, but their containers are puny. Splurging on the extra 3" was worth it for trash and recycling cans we could actually use.
Next to the trash cabinet is a modification we cooked up after I saw a similar design on Ikea Fans. I wanted our smallish microwave off the cabinet and as out-of-sight as possible. We briefly toyed with buying a new microwave-as-vent-hood unit, but those are so dang huge and, let's face it, microwaves are not pretty. Why feature it on the smallest wall of my kitchen if I didn't have to? Thus the microwave cabinet was born. My mom did something very similar in her recent kitchen remodel, so I knew it was possible.
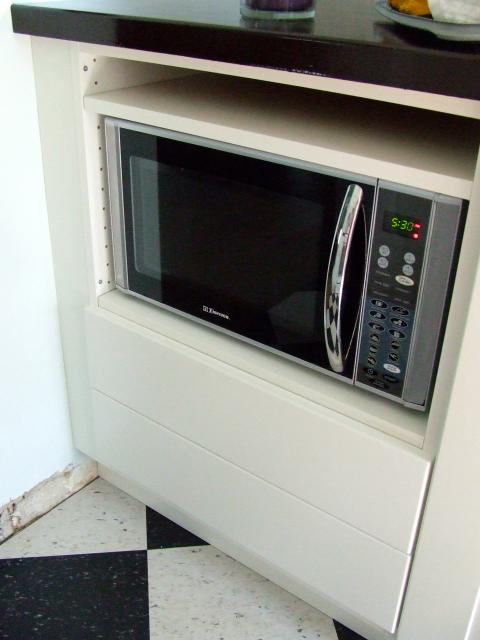
Here's the thing: There are gaps in that cabinet because the Ikea kitchen salesman talked me out of my original plan (a deep drawer on bottom and a standard drawer on top of that, then a shelf for the micro) because he thought it wouldn't fit the micro; he wanted me to buy two standard drawers. Imagine my irritation when we put it all together and I saw that, indeed, my original plan would have worked and was actually an awesome plan to begin with. For now we're living with it and will eventually replace the bottom standard drawer with the deep drawer, thus eliminating the unsightly gap.
Look at me, gushing about my trash cans. I must be an adult.
I'm almost done, I promise. I wanted to show you at least one of my upper cabinet units in action. This is the two-cabinet unit above the microwave, to the left of the sink, which we use for most-used pantry items (we have a pantry downstairs for the long-term stuff) and some mixing bowl storage.
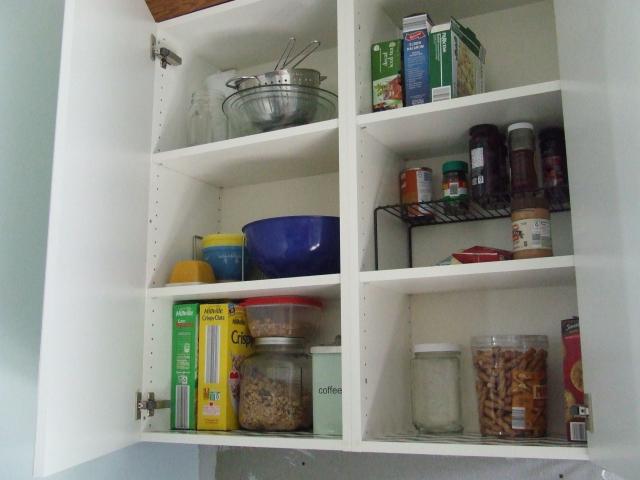
It's not all stored in cute jars with chalkboard labels, and I am sure it will get stuffed full as time goes on, but I can guarantee that it will always be neat and tidy. With chevron shelf liner. Amen.
And…that's where we are! Right now, our kitchen is functional and pretty and getting there. We need trim and molding, tile, a couple appliances, lights, and a few other relatively minor touches, but the big, scary stuff is done. And guys, it feels so good. So very good.
NO. MORE. PLASTER DUST. Amen.
So after the floors were done, my father-in-law came to our house for a week and worked with my husband on bringing the kitchen to a usable point of existence. This meant installing the sink, faucet, and plumbing, getting in all the cabinets, and installing doors and drawers. This also meant building a fridge enclosure, as well as my father-in-law, who is a carpenter, cutting all of our butcher block countertops for us so that we could stain, seal, and install them later. They got all that work done in great time and did a brilliant job. If you know them and see them at any point, give them a few congratulatory butt slaps for a job well done.
Because I like high drama kitchen reveals, here's a reminder of what it looked like when we moved in during March of 2008:

The dusty ruffled valances and mini blinds really sealed the whole home purchase deal for me.
As of right this moment, this is my kitchen:

I know, right? Turn your head and look at the other side.

Sorry for the awkward angles. It's a galley, you guys. It's lovely, but it's still tight.
If you are an observant person, you might notice that we moved the range and somehow lost a fridge. More on the fridge later, but yes, we moved the stove. We needed the magical kitchen triangle to be closer than it originally was, and we were sick of having a window next to a stovetop. We are the royal family of open windows, and we were sick of our coveted afternoon breezes blowing out the gas burners. Plus the window at the end of the galley faces south, which means hours of fresh, hot sunlight pouring on whichever poor soul was destined to cook at the oven in the evenings. (That would be me.) So our contractor moved the gas line and put in all the necessary equipment for a range hood (WHICH WE'VE NEVER HAD, OMG, YOU MEAN I WON'T HAVE TO SWEAT OUT OF THE TOP OF MY HEAD IN ORDER TO PREPARE A MEAL NOR DEAL WITH THE ODOR OF A THOUSAND DINNERS SEALING THEMSELVES IN THE WALLS OF MY HOME, WHAT WITCHCRAFT IS THIS??!!) and then, AND THEN, I said, "Hey, can you do a wall niche?"
All casual-like, as if I ask for niches from talented professionals ALL THE DANG TIME.
I got me a wall niche.

I will probably say this about 649 other things before this blog post is done, but that wall cut-out might be my favorite thing in this room. It's certainly my favorite a-ha! moment that came from my very own brain pan. After we demoed but before our contractor arrived, I was just standing around, reminding myself that it would all be worth it (*sob*) and then I turned toward this blank wall and BAM Jesus hit me with this amazing idea: You are going to have to tear out the walls anyway, woman. Why not use that to your advantage and look like a kitchen from a magazine?
Thus the idea for Wall Niche was born.
Only after Jesus hit me with this amazing idea did I turn to Pinterest and find inspiration photos to show the contractor, who is a total genius and completely caught my vision AND THEN hit me with this other amazing Jesus-given thought: "Instead of making it a rectangle like most of these you see, why don't we round out the top and make it an arch that mimics the arched doorways in your home?"
I do not want to be flippant about our Christ, but man, He was working niche miracles that day. Along with our contractor, who took notes on how high and wide I was thinking, broke into that wall, worked around and built up the studs, and just did an amazing job with it. He gets a million points to Gryffindor for that built-in ALONE.
(I should note that all of the drywall on this side, including the niche, will be tiled. It's bare now, obviously. This is another time where you need to squint and imagine.)
Just above the miracle niche, in between the two upper cabinets, is where we're all prepped for a built-in exhaust fan:

Instead of going with a naked stainless hood, we are going to use a model that requires a custom-built cover so that it looks like just another cabinet, painted white and all. I'm not really a stainless fan, and I like the idea of as little interference on this small wall of cabinets as possible. Here's a possibility:

I literally just googled that right now because I am too lazy to sign into Pinterest and find the actual 300 range hood posts I have saved, but you get the idea. We're holding off on the range hood and surround because we need to save up for that project. I don't know if I've mentioned this, but dang, remodeling a kitchen from scratch is expensive. Did you know that? Well, now you do.
Just to keep it real, here's a picture of the actual light we are using in this room:

Believe it or not, it's still better than what we had before. By the time this is all done, we'll have two semi-flush mount schoolhouse fixtures on the ceiling, a pendant over the sink, under cabinet lighting all over the place, and lights built into the range hood. But I am planning a special thing for my ceiling that forces us to hold off on lights for now. I'm keeping quiet about that at the moment. For now, bare bulb dangling from the ceiling is our jam.
Something to note: You may have noticed the soffits the men built up on top of the wall cabinets. These serve a couple of purposes. The soffit above the wall we're looking at, the stove wall, conceals the duct work for the range hood ventilation. (It vents out the side of the house, to the left, which is the back side of our home.) The soffits also will serve as a place for trim and crown molding. I wanted my cabinets to go all the way to the ceiling for as built-in a look as possible. I really think that finishes a kitchen, and the idea of a few inches of space just gathering dust above my food prep areas fills me with ick. Ikea wall cabinets are supposed to be hung something like 5" from the ceiling (plus we have old plaster walls, so who knows how level everything is?), so the soffits fill in that gap and will eventually get covered for a faux built-in look. Make sense?
Moving on to the fridge. I decided to NOT plan our current fridge into this design because it is a) 15+ years old and b) too big for our space. It's a perfectly functional Whirlpool that works great, but I couldn't get cabinet configurations to work with its two-door, 34" self. It's just too big for the room. So we moved it to the basement and it is now officially called Basement Fridge and that's what we are using for now. Why, you ask? Well, because the 30" fridge that I want is expensive and I am also saving up for that. For now, we have a perfectly proportioned space just waiting for it.

If you look carefully in that enclosure, you can see the drywall patch from what used to be the only light switch in the room. Because walking all the way to the end of the room, sticking your hand in the dusty space in between the fridge and the wall, and groping for a light switch/outlet plate (why the outlet? no one ever knew) made SO MUCH MORE SENSE than just having switches in reasonable places. Now we can turn our bare dangling bulb on and off from two places in the room, just like rich people.
Here's another angle of the enclosure:

In case you're looking for specifics, that's a 24" X 24" X 30" over-the-fridge Akurum cabinet. It's built out just slightly so that it, combined with the panel on the right, will cover the refrigerator COMPLETELY and only show the barest amount of huge, looming appliance. I can't afford a cabinet depth refrigerator, either money- or width-wise, so I'm going to fake it as best as possible with a standard depth fridge. Our contractor was a genius who suggested we pull out the plaster in between the studs for appliance ventilation, thus giving us a few inches off the depth dimensions. We're just fine using Basement Fridge for the time being, but I know this will all look great when it's got a real, actual Main Level Fridge filling it out. (We'll still keep Basement Fridge! We love you, Basement Fridge.)
Jump to the right of the stove and you'll get a taste of how great Ikea's cabinet options are for space-crunched kitchens. Here we have what looks like an innocent, 15" lower cabinet door…

…but open it up and *gasp!* it actually turns out to be a 15" pull-out cabinet with two narrow drawers built into its top!

Kroger and Aldi spice containers represent!
I bought a thing from Ikea that helps hold up cookie sheets and what-not, and this is a PERFECT amount of space for me. For now I'm putting spices in the wee drawers. I know some people would fret about them being next to heat, and I'll take that into consideration, but for now I actually really like them here. They aren't toppling over one another in an upper cabinet, and since I'm a shortie with short legs, having them looming over me in an upper cabinet doesn't really make much sense anyway.
To the left of the stove on the bottom is a three-drawer unit that I completely forgot to photograph. Use your imagination.
Okay, let's shift our attention to the other side of the kitchen. On either side of the window on that wall are cabinets. On either side of the sink: cabinets. I squeezed as many cabinets as possible into this space, knowing it would be holding the bulk of my storage and counter space. This is another reason we moved the stove: Now I have over 8 feet of counter space just on this wall alone, as opposed to the 4 feet in the original design. If I had left the stove where it was, I would have lost out on all that glorious, nearly continuous countertop.
In this next photo you can see the cabinets to the right of the window/sink, as well as the butcher block countertop (I got it so dark, you guys!) and the window trim the men had to rip off (for now) to get the cabinets installed.

First, those countertops. Yes, they're butcher block; maple, in fact. We bought them in 8 foot sections and, as mentioned, my father-in-law expertly cut them in four pieces and routed the edges. Over the course of about three weeks, we stained them (Dark Walnut by Minwax) and then sealed them with Waterlox. I wanted dark to begin with, and boy, did I get dark. The maple just loved that stain. My only regret is that they are so dark that I lost most of the look of the wood grain, but I can deal. I like them, but yes, they are hard to keep looking perfectly clean. Don't get them this dark if you're not a fanatic like me who wipes down her counters approximately every 20 minutes. If you're looking for a more comprehensive tutorial, might I suggest looking here? Ours still need one final light sanding and oiling, but we installed them first so we could have better light than we did working on them in the garage. I can highly recommend the Waterlox, and I can also highly recommend my children's godparents, who had a bunch of Waterlox on hand and graciously let us use what they had left, thus saving us some money. Blessings on their heads.
Moving on. I don't have knobs or handles yet, so it's hard to tell just what is what in the above photo, but that lower bank of cabinets houses some of the most glorious kitchen storage known to man. When I designed my kitchen, I designed it with nearly all drawers in the lower cabinets, knowing that I would be paying a lot more money than if I just settled for standard doors or even a mixture of doors and drawers. I love drawers, you guys. They use space wisely and are far easier to clean, plus with drawers you never find yourself sitting on the floor, half of your body inserted inside the cabinet, searching for a lost Pyrex lid. (FUN FACT: Been there, done that.) I figure, hey, how often do you get to design a kitchen from scratch? Pay the few hundred dollars extra and get the dang drawers.
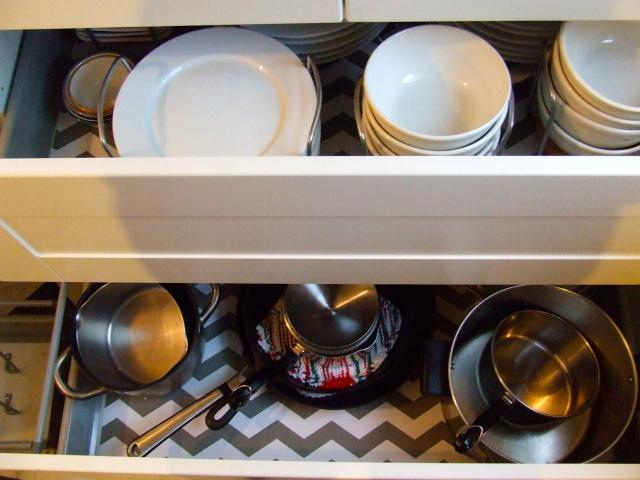
So this same lower bank of cabinets looks like this when you walk up our back stairs from the basement or back door:

That's a 36" cabinet unit that has two deep drawers on bottom topped by two smaller ("standard" in Ikea-speak) 18" drawers. Those big drawers are glorious. Here's a semi-crappy shot of both of them in action:

The top holds ALL of my everyday dishes in pert little organizing caddies, and the bottom holds ALL of my pots, pans, and matching lids. Plus a griddle. I lined all of my cabinets and drawers with this liner and while it's indeed cute and affordable, like all shelf liner it represents a painstakingly slow job that will try your patience and make you lose your salvation approximately five times. You have been warned.
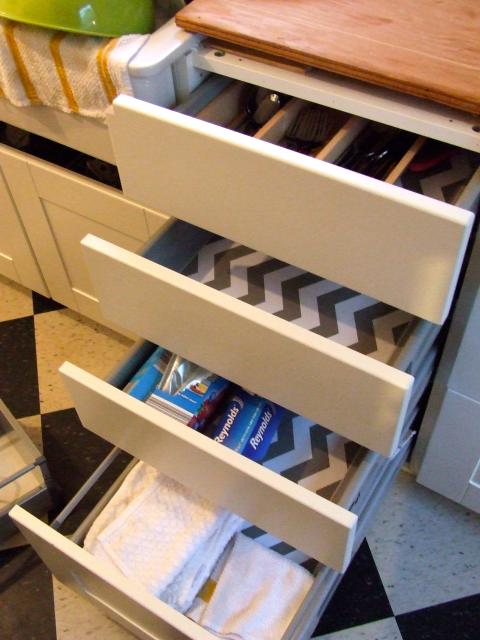
Directly next to the 36" drawer cabinet OF GLORY is an 18" four-drawer cabinet. The drawer on the bottom is a deep drawer and the other three are standards. As you can see, one of them is empty because I don't yet have anything with which to fill it. That's how awesome this kitchen is, you guys.

(That picture was taken while we were still finishing our countertops and were just using plywood.)
Next is the sink and its cabinet, which I'll feature some other time. It's the only basic lower cabinet I have, since the plumbing and some modifications we did to the sink didn't allow for the depth necessary in a drawer or pull-out. To the left of the sink is another feature that might be my favorite: an 18" pull-out cabinet that surprisingly effortlessly becomes a pull-out trash and recycling cabinet.

I realize this isn't perhaps as sexy-looking as a Rev-a-Shelf unit, but it works beautifully and really looks great in person. I had to measure very carefully for the containers, but these were some from Lowe's that fit well enough to allow one of those mini-drawers at the top of the cabinet. (You can see it closed in the above photo. It's our junk drawer.) I LOVELOVELOVE having my trash and recycling containers right here, and the side parts to the drawer unit hold them in just fine. One thing I was worried about was them not staying upright, since I know the Rev-a-Shelf design holds them up on their tops, but thankfully my fears ended up being unfounded. Ikea will recommend a 15" pull-out cabinet with their own plastic containers for trash, but their containers are puny. Splurging on the extra 3" was worth it for trash and recycling cans we could actually use.
Next to the trash cabinet is a modification we cooked up after I saw a similar design on Ikea Fans. I wanted our smallish microwave off the cabinet and as out-of-sight as possible. We briefly toyed with buying a new microwave-as-vent-hood unit, but those are so dang huge and, let's face it, microwaves are not pretty. Why feature it on the smallest wall of my kitchen if I didn't have to? Thus the microwave cabinet was born. My mom did something very similar in her recent kitchen remodel, so I knew it was possible.

Here's the thing: There are gaps in that cabinet because the Ikea kitchen salesman talked me out of my original plan (a deep drawer on bottom and a standard drawer on top of that, then a shelf for the micro) because he thought it wouldn't fit the micro; he wanted me to buy two standard drawers. Imagine my irritation when we put it all together and I saw that, indeed, my original plan would have worked and was actually an awesome plan to begin with. For now we're living with it and will eventually replace the bottom standard drawer with the deep drawer, thus eliminating the unsightly gap.
Look at me, gushing about my trash cans. I must be an adult.
I'm almost done, I promise. I wanted to show you at least one of my upper cabinet units in action. This is the two-cabinet unit above the microwave, to the left of the sink, which we use for most-used pantry items (we have a pantry downstairs for the long-term stuff) and some mixing bowl storage.

It's not all stored in cute jars with chalkboard labels, and I am sure it will get stuffed full as time goes on, but I can guarantee that it will always be neat and tidy. With chevron shelf liner. Amen.
And…that's where we are! Right now, our kitchen is functional and pretty and getting there. We need trim and molding, tile, a couple appliances, lights, and a few other relatively minor touches, but the big, scary stuff is done. And guys, it feels so good. So very good.
NO. MORE. PLASTER DUST. Amen.
Wednesday, July 9, 2014
The Kitchen: Demo, a Floor of Horror and Hope, and PLASTER
So I'm back to talk a little more about our experience redoing our kitchen. The last kitchen post I wrote went on and on (sorry--I'm pretty excited) about our plan, and I gave you a bunch of pictures that kinda sorta communicated what look I was going for. In case you need a refresher, here is a bullet list of my large-scale goals:
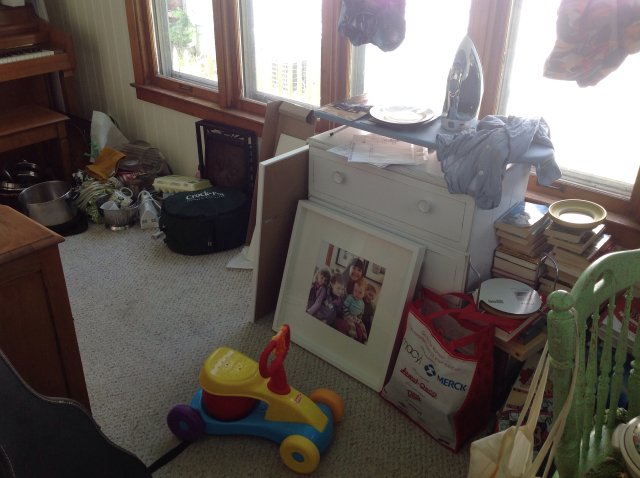
…which meant that I had to shift our kitchen to about four different parts of the house, including a large portion of our dining room. Since we have bookshelves that house a lot of our books in our dining room, those books had to be moved to the sunroom. Kitchen stuff also went in the sunroom. And the basement. It was madness and chaos, and it's still presenting a challenge to put back together.
My poor husband was going crazy with the mess in the sunroom, where he has his desk and was attempting to finish his dissertation.
This normally houses books, which are seen stacked in the above photo:

Rookie mistake: Putting your mostly-used kitchen items right next to the doorway of the kitchen…because: Plaster.
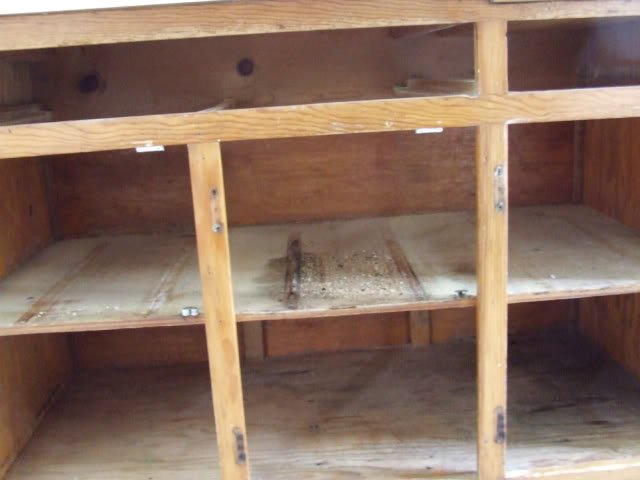
When the time was right, my husband started ripping up the rest of the kitchen. Here is a beautiful view inside my cupboards. All that dust is actually sawdust because, you see, they were slowly grinding themselves apart.
He got great satisfaction from ripping off the wall cabinets. Here's a shot from early in the demo process:
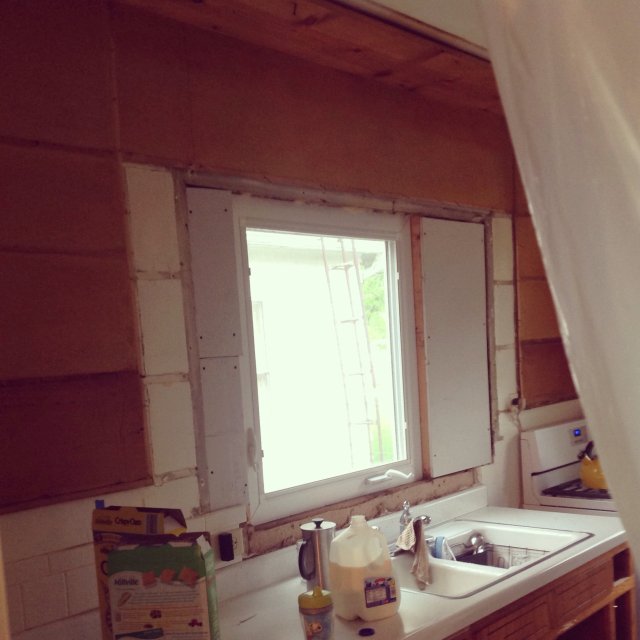
Once the room was cleared, it was time to tackle pulling up the floor. You might recall that we had crappy peel-and-stick vinyl flooring that had long since given up the will to stick. We knew we were going to be dealing with multiple layers of flooring; we just didn't know quite how many or how much asbestos-based backing was involved. Pulling it all up represented a couple of days of sweaty, hard work for my husband. He wore a mask and broke the tiles up as little as possible before sealing them in heavy, construction-grade garbage bags.
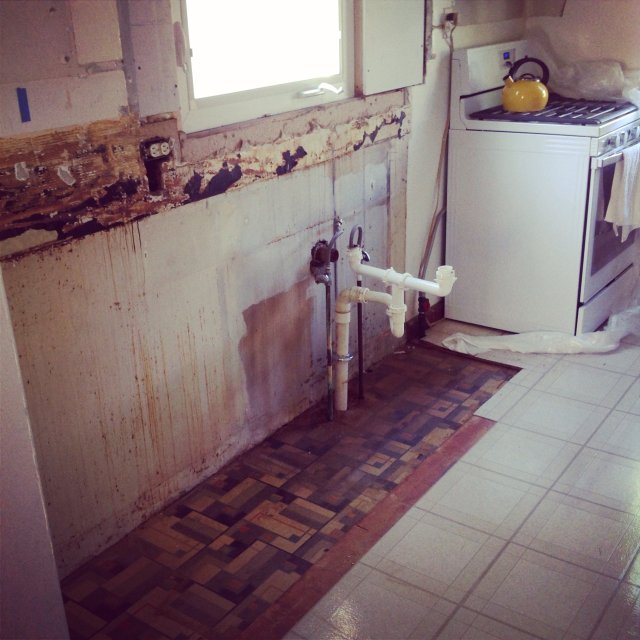
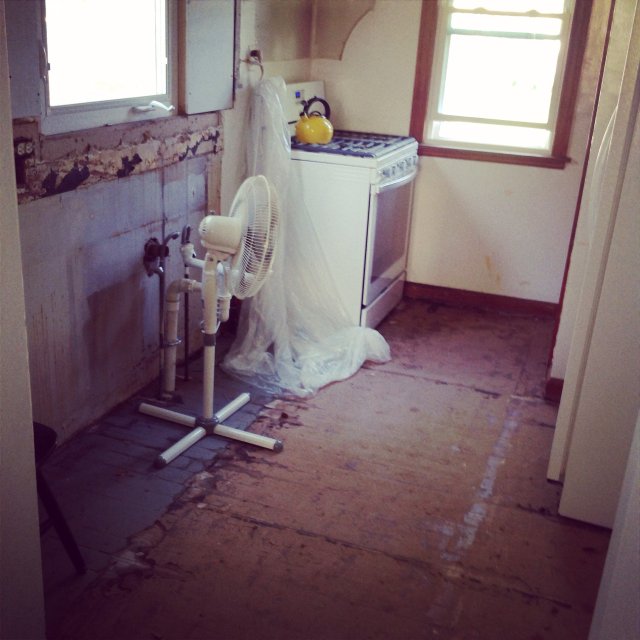
Ugh, those walls. That floor. This was an ugly time. My yellow tea kettle represents hope.
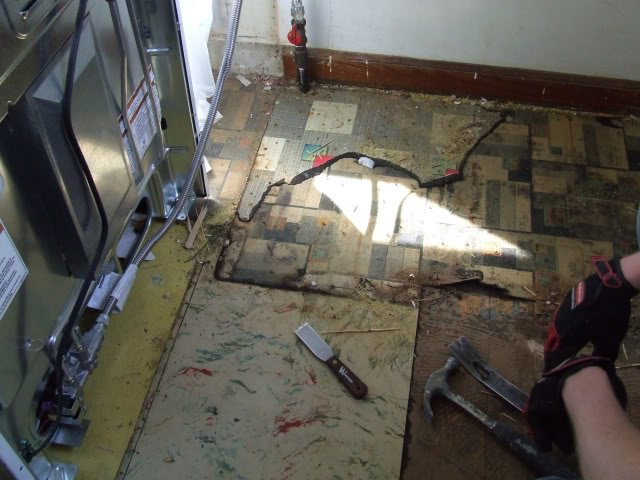
I took the following shot when he found himself in a corner surrounded by at least four different layers of flooring.
Once the room was totally clear (except for the appliances), we could see the pine base over the floorboards. The wood isn't really appropriate for flooring all on its own (it's very soft and very, very rough after all the flooring being glued and nailed to it.) He vacuumed it thoroughly after removing a million nails and got it really clean.
We hired a contractor for the work we just had no clue on how to handle nor any desire to screw up royally, as we surely would have. The electrical work basically represented a complete rewiring of the entire room in a 66-year-old home, plus lots of new stuff, all of which was well and above our skill set or the skill sets of our (talented and tireless) fathers. Rule #1 of renovation: If you can't do it well, hire out to a pro. It's money well spent.
This was the hardest time. If you are even vaguely contemplating a major kitchen renovation, you need to first and foremost ask yourself if you can handle the following things:
Once our contractor was done with his major work, The Professor and a friend (thank you, Dan!) put in the luan on the floor. This took a few hours of solid work. Here is the luan (it's a thin plywood specifically designed for underlayment) with the beginnings of chalk lines:
The chalk lines got gradually more complicated, as he was preparing to lay VCT flooring on a perfect diagonal. As you may remember from my previous post, my original black-and-white choice was linoleum, but it proved to be prohibitively expensive for us. (I still think linoleum is an awesome option, you guys, and I wish it could have worked.) I stumbled upon Armstrong VCT (Vinyl Composite Tile) flooring and fell in love with its linoleum look-alike charm.
VCT Facts, in case you're intrigued: It's vinyl, yes, so it's not green like linoleum. Sorry. BUT. It's very thick (not at all flimsy like peel-and-stick), and the color goes all the way through, meaning a scratch isn't the end of the world, though it's pretty hardy flooring and can take a beating from, say, a family of six for many years. At our Lowe's you can buy only two different colors off the shelves, even choosing to buy the tiles individually, but if you want any other of the multitude of colors on offer, you have to order them by the box. (This is silly for us. We have an Armstrong plant in town, just down the road from Lowe's.)
At Lowe's the tile was $.89 per square foot, and so I bought some, but then we travelled closer to Chicago to another store (Floor and Decor in the Plainfield area, if you're local) and found a black and a white that I actually liked better (I think they were Classic White and Classic Black) for $.69 a square foot. We needed 96 square feet, so yeah, LOTS cheaper than linoleum, which was going to be more like $8 or $9 a square foot. We could only buy the tiles from Floor and Decor in boxes of 45 square feet, which left us just barely under the necessary amount when we bought one box of each color, so I kept a few of the individual tiles from Lowe's, even though they weren't an exact match. Those slightly off-white pieces went on sections of the floor that were going to be under cabinetry; we like to think of future homeowners redoing the kitchen in 30 years, trying to figure out WHAT IN THE HECK the Cases were thinking doing different-colored tiles. I hope the Internet is still around and they find this blog post.
The Professor followed this tutorial to carefully install the tile along a perfect diagonal. He used glue specially made for VCT. He did an amazing job, and to the uninitiated, it really looks like linoleum. It's soft to the touch and feels great under your feet. And that tutorial is pretty great, too. I'd recommend it for a newbie. In general, I'd recommend this flooring.
Here he is during a dry-run of the tile. He carefully covered the entire floor exactly as he wanted it, cutting as he went, before removing half of the tile for glue.
King Peter made his necklace.
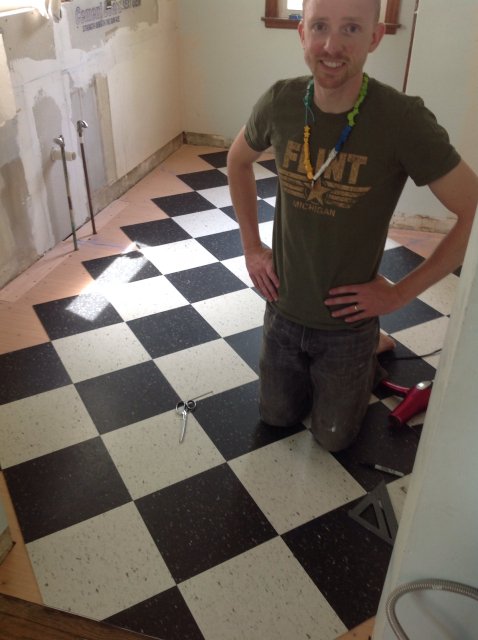
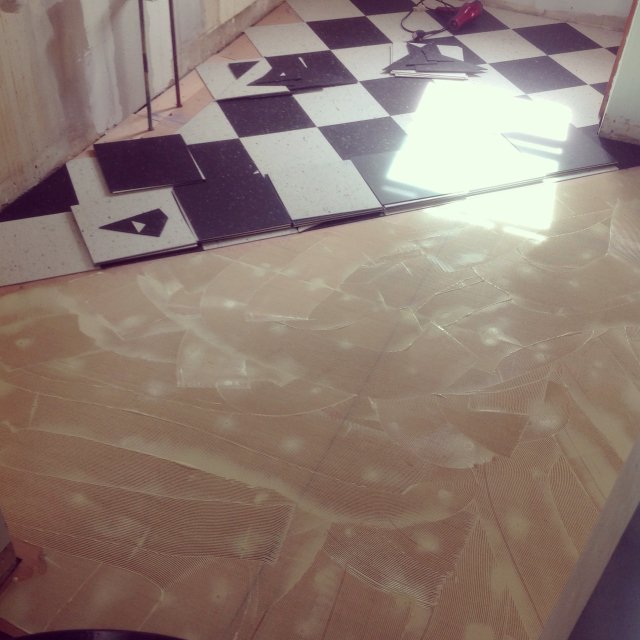
Then he laid that half and repeated the process for the other side. It represented an entire day's work; he worked late into the night, and the results were awesome.
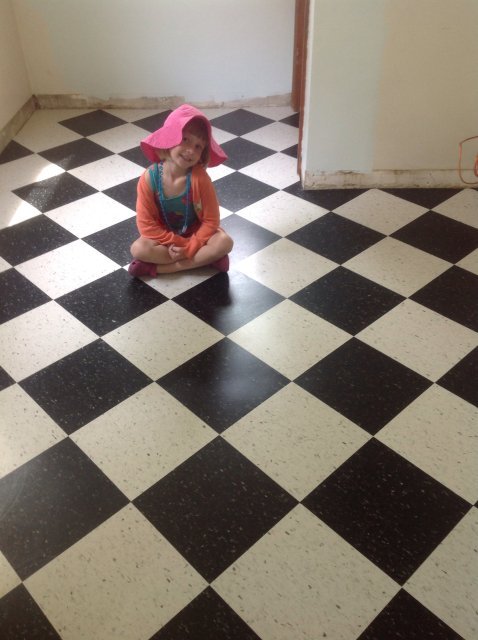
If you look really closely at the above shot, you can see what our home's future owners will be stumped about: the slightly off-white single tiles we used to fill in space where we didn't have enough of our chosen color. Cabinets go there, so no worries, future owners. We had a method to our madness.
Once the flooring had had time to settle (a day or so--you could walk on it after just a few hours), we cleaned it really well and sealed it with a liquid sealant the guys at the hardware store had recommended. It's not a true wax, but it helps fill in the teensy cracks and gives the tile a thin protected coat.
At this point we could think about cabinetry. (FINALLY. It really does have to get really bad before it can actually start looking like a kitchen again.) My father-in-law, who is a professional carpenter who gives us a week of his time each year for home projects (BLESS HIM), came in town and he and The Professor got to work with the cabinetry, sink, plumbing, and all the other big stuff they could get done in a week. But I'll save the details for another post.
It's going to look awesome, you guys. I'm completely impartial.
- White, bright, and fairly traditional, or at least timeless. I don't want to hate this space in 10 years. I want the minor details (knobs, paint, decor, lighting) to be easily changeable for an updated look; I want the major stuff (cabinets, countertop, sink, appliances) to stay fresh and attractive for a looooong time. I looked at old home magazines (10-15 years old) and found kitchens that had escaped looking dated; they were all white with Shaker-style cabinetry.
- Lots of storage. Lots of drawers. I want this kitchen to use every inch of available space for storage; thus, the choice of white. (Also, I avoided open shelving. I know it's cute and all the rage right now, but it doesn't feel timeless to me, nor does it seem to use space wisely in a room where space is at a premium. I can incorporate shelving in other ways.) Not only is the white timeless, in my opinion, but it will offset the to-the-ceiling wall cabinets and help to prevent them from looming. I have two windows that face west and south, so natural light isn't a problem.
- So. Many. Outlets. (We had one outlet. Only one side worked.)
- So. Many. Lights. (I had one circular fluorescent light set in the middle of the ceiling. This is dangerous when you are near-sighted and have to cut vegetables in the dark. We live in Illinois, people! Winter is long! I need light.)
- Features that made sense. Did you know that to turn on our one kitchen light we had to walk all the way to the end of the kitchen, reach behind the side of the fridge, and grope for a switch that was inexplicable placed there? Did you know only one section of one wall had cabinets? A lot about our kitchen never made sense to me, and sense and order are next to Godliness in my book.
- A black-and-white floor. I have wanted one since high school. I figured that if a burning desire for a specific type of kitchen floor was going to hang onto my housing-lust center of my brain for this long, I should probably give in.
- An apron-front farmhouse sink. We're skipping a dishwasher, so I also needed my dream sink to have two basins.
Thanks for bearing with me on that list. It helps me get my thoughts in order sometimes, too. Plus this is my blog and you are choosing to read it. I figure that you're just asking for this sort of thing.
So! In May we started demo-ing very quietly and slowly, one door at a time. It felt like a small rebellion, but really it was because I was desperate to do SOMETHING, ANYTHING to make our kitchen move along. I bought the cabinetry in March while Ikea was still doing its spring kitchen sale (I'll talk about our choice of cabinetry in another post), so all those 5,000 boxes, give or take a thousand, had been sitting in my garage for weeks, openly mocking me. We had a timeline, and I was anxious to push it up. So I started pulling off doors...

…which meant that I had to shift our kitchen to about four different parts of the house, including a large portion of our dining room. Since we have bookshelves that house a lot of our books in our dining room, those books had to be moved to the sunroom. Kitchen stuff also went in the sunroom. And the basement. It was madness and chaos, and it's still presenting a challenge to put back together.
My poor husband was going crazy with the mess in the sunroom, where he has his desk and was attempting to finish his dissertation.

This normally houses books, which are seen stacked in the above photo:

Rookie mistake: Putting your mostly-used kitchen items right next to the doorway of the kitchen…because: Plaster.
When the time was right, my husband started ripping up the rest of the kitchen. Here is a beautiful view inside my cupboards. All that dust is actually sawdust because, you see, they were slowly grinding themselves apart.

He got great satisfaction from ripping off the wall cabinets. Here's a shot from early in the demo process:

Once the room was cleared, it was time to tackle pulling up the floor. You might recall that we had crappy peel-and-stick vinyl flooring that had long since given up the will to stick. We knew we were going to be dealing with multiple layers of flooring; we just didn't know quite how many or how much asbestos-based backing was involved. Pulling it all up represented a couple of days of sweaty, hard work for my husband. He wore a mask and broke the tiles up as little as possible before sealing them in heavy, construction-grade garbage bags.
Ugh, those walls. That floor. This was an ugly time. My yellow tea kettle represents hope.

I took the following shot when he found himself in a corner surrounded by at least four different layers of flooring.

Once the room was totally clear (except for the appliances), we could see the pine base over the floorboards. The wood isn't really appropriate for flooring all on its own (it's very soft and very, very rough after all the flooring being glued and nailed to it.) He vacuumed it thoroughly after removing a million nails and got it really clean.

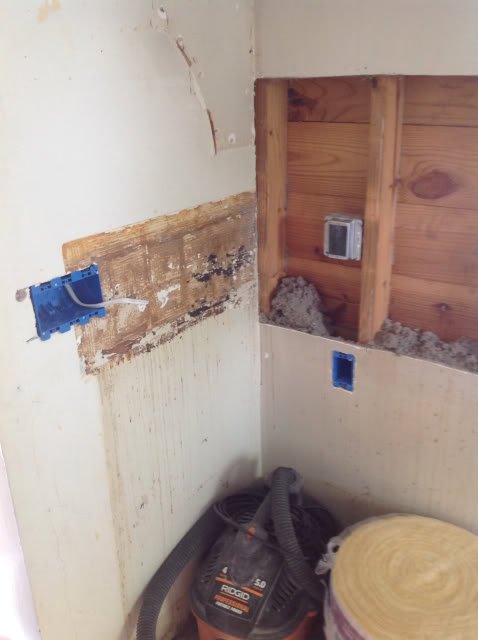
In between getting the floor pulled up and laying the new tiles, our contractor moved in and worked for something like 8 solid days on electrical work, venting a fan for above the range, moving the gas hook-up for our range, moving the heating/cooling to the opposite side of the room, creating a wall niche for above the range, and about a million other crazy things. He was amazing. Here is a vague shot of walls torn apart and lighting boxes going in:

We hired a contractor for the work we just had no clue on how to handle nor any desire to screw up royally, as we surely would have. The electrical work basically represented a complete rewiring of the entire room in a 66-year-old home, plus lots of new stuff, all of which was well and above our skill set or the skill sets of our (talented and tireless) fathers. Rule #1 of renovation: If you can't do it well, hire out to a pro. It's money well spent.
This was the hardest time. If you are even vaguely contemplating a major kitchen renovation, you need to first and foremost ask yourself if you can handle the following things:
- Copious, just RIDICULOUSLY COPIOUS, amounts of dust. Drywall is bad; plaster is worse. We have plaster. It got into my brain. True story.
- Eating hot dogs for 6 weeks. Every night. Or at least it will feel like every night. I don't like hot dogs on my best days, and these were not my best days.
- Washing your dishes in your tub. For weeks. Bonus points if you only have one full bathroom! (That's us. Naturally.)
- Having to make 2 billion tiny-yet-important decisions that you had never even conceived--I mean, they weren't even on your radar, they weren't on ANYONE'S radar--right there on the spot, knowing that you'll have to live with these quick, important decisions for the rest of your natural-born life. (I am going to live out my life and die in this home at a ripe old age and get buried in the backyard, so no, I'm not being dramatic.) Should the lights be centered in the room or along the doorway? At what height do you want your outlets? Do you want to plan way ahead and make sure your tile backsplash lines up perfectly with your outlets? (WHO DOES THAT? I mean, I admire that amount of planning, but seriously.) On and on and on and on. I was amazed at the questions our contractor would throw at me. I looked like a deer in the headlights 95% of the time. He was very patient.
- Did I mention the dust?
These considerations are, of course, already on top of the normal considerations of any renovation, which include going above budget, unexpected problems/substitutions, marital discord, and total exhaustion.
I am so glad we are past this point. It's a first-world thing to complain about, but hey, I live in the first world, and I'm trying to do the best thing for my family and my home. And it was very, very hard.
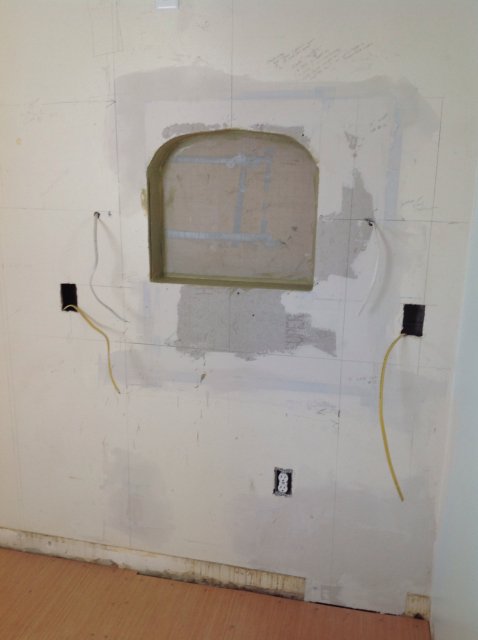
But! Worth it all for this niche. Just imagine it over our stove and filled with bottles of oil.
But! Worth it all for this niche. Just imagine it over our stove and filled with bottles of oil.

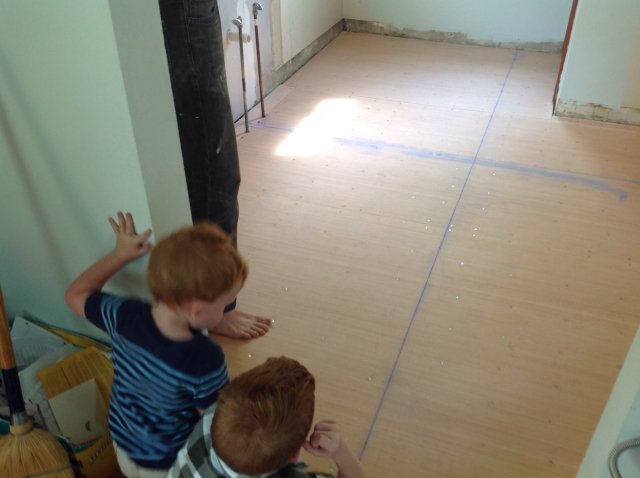
Once our contractor was done with his major work, The Professor and a friend (thank you, Dan!) put in the luan on the floor. This took a few hours of solid work. Here is the luan (it's a thin plywood specifically designed for underlayment) with the beginnings of chalk lines:

The chalk lines got gradually more complicated, as he was preparing to lay VCT flooring on a perfect diagonal. As you may remember from my previous post, my original black-and-white choice was linoleum, but it proved to be prohibitively expensive for us. (I still think linoleum is an awesome option, you guys, and I wish it could have worked.) I stumbled upon Armstrong VCT (Vinyl Composite Tile) flooring and fell in love with its linoleum look-alike charm.
VCT Facts, in case you're intrigued: It's vinyl, yes, so it's not green like linoleum. Sorry. BUT. It's very thick (not at all flimsy like peel-and-stick), and the color goes all the way through, meaning a scratch isn't the end of the world, though it's pretty hardy flooring and can take a beating from, say, a family of six for many years. At our Lowe's you can buy only two different colors off the shelves, even choosing to buy the tiles individually, but if you want any other of the multitude of colors on offer, you have to order them by the box. (This is silly for us. We have an Armstrong plant in town, just down the road from Lowe's.)
At Lowe's the tile was $.89 per square foot, and so I bought some, but then we travelled closer to Chicago to another store (Floor and Decor in the Plainfield area, if you're local) and found a black and a white that I actually liked better (I think they were Classic White and Classic Black) for $.69 a square foot. We needed 96 square feet, so yeah, LOTS cheaper than linoleum, which was going to be more like $8 or $9 a square foot. We could only buy the tiles from Floor and Decor in boxes of 45 square feet, which left us just barely under the necessary amount when we bought one box of each color, so I kept a few of the individual tiles from Lowe's, even though they weren't an exact match. Those slightly off-white pieces went on sections of the floor that were going to be under cabinetry; we like to think of future homeowners redoing the kitchen in 30 years, trying to figure out WHAT IN THE HECK the Cases were thinking doing different-colored tiles. I hope the Internet is still around and they find this blog post.
The Professor followed this tutorial to carefully install the tile along a perfect diagonal. He used glue specially made for VCT. He did an amazing job, and to the uninitiated, it really looks like linoleum. It's soft to the touch and feels great under your feet. And that tutorial is pretty great, too. I'd recommend it for a newbie. In general, I'd recommend this flooring.
Here he is during a dry-run of the tile. He carefully covered the entire floor exactly as he wanted it, cutting as he went, before removing half of the tile for glue.
King Peter made his necklace.

Once half of the room had glue down, he had to wait a couple hours for it to get sufficiently tacky.

Then he laid that half and repeated the process for the other side. It represented an entire day's work; he worked late into the night, and the results were awesome.

If you look really closely at the above shot, you can see what our home's future owners will be stumped about: the slightly off-white single tiles we used to fill in space where we didn't have enough of our chosen color. Cabinets go there, so no worries, future owners. We had a method to our madness.
Once the flooring had had time to settle (a day or so--you could walk on it after just a few hours), we cleaned it really well and sealed it with a liquid sealant the guys at the hardware store had recommended. It's not a true wax, but it helps fill in the teensy cracks and gives the tile a thin protected coat.
At this point we could think about cabinetry. (FINALLY. It really does have to get really bad before it can actually start looking like a kitchen again.) My father-in-law, who is a professional carpenter who gives us a week of his time each year for home projects (BLESS HIM), came in town and he and The Professor got to work with the cabinetry, sink, plumbing, and all the other big stuff they could get done in a week. But I'll save the details for another post.
I'll just leave you with this little teaser:

It's going to look awesome, you guys. I'm completely impartial.
Saturday, July 5, 2014
Interview with a Seven-Year-Old
Interview with one pretty awesome 7-year-old. Mohawk edition. We had some time alone today during the sleepy, still part of the afternoon, so I asked if he'd like me to interview him. He agreed. All of his answers took lots of time and thought; this kid does nothing rashly or without careful consideration. He is very deliberate.

Christine: "Please state your name."
B: "B.R. Case."
C: "What grade are you going to be in?"
B: "First. I mean, second." (second)
C: "What is your favorite food?"
B: "Hamburgers."
C: "What do you like on your hamburgers?"
B: "Ketchup and mustard."
C: "No cheese?"
B: "No cheese."
C: "What's the best thing we've done this summer?"
B: "Hm. The times we went to our grandma and grandpa's house."
C: "What is your favorite thing about your brother J?"
B: "He never tries to bug me when I'm reading a book."
C: (laughs)
B, defensively: "What?!"
C: "I just think that's a really good answer. It made me laugh...So what's your favorite book?"
B: "Hero Factory." (This is disappointing to me, but he is seven.)
C: "What is your favorite thing to do? Like if you had a day free, what would you do?"
B: "I would play video games all day because we don't have any video games."
C: "What's your favorite thing about your sister?"
B: "She likes Batman better than unicorns." (This is perhaps not factually accurate, though she does like Batman a lot.)
C: "So what's your favorite thing about H?"
B: "Like when I'm drawing a picture, he doesn't mess it up."
C: "What thing do you think you do best?"
B: "Read well."
C: "What is one thing you think you could work on?" (I had to explain this one a few times for clarity.)
B: "Not hurting H when I'm frustrated." (This surprised me, since it's just not true. B and H are best brother friends.)
C: "What's your favorite thing to play outside?"
B: "Soccer."
C: "Okay. When you grow up, what book would you like to write? Or you could tell me what it's about."
B: "Bats, non-fiction books, about how they live and what they eat and how many types of bats there are. I think that's it."
C: "If you could have a pet, what would it be and what would you name it?"
B: "I would have a dog; I would name it Scruffy. He would be a Golden Retriever 'cause Golden Retrievers, if you throw a stick, they fetch it, and that's why they're called retrievers."
(bathroom break)
B: "Another question you could ask is if you could make yourself into any dessert, what would it be."
C: "Okay. If you could be any dessert, what would it be?"
B: "Chocolate chip cookies."
C: "Okay. Two more questions. What's your favorite video game to play at Ta and Pa's?" (his grandparents, my parents)
B: "It would be Mario Cart on the Wii."
C: "Last question. What is the best thing you've done so far this summer?"
B: "Ride my bicycle without training wheels."
That's a wrap! What a cool kid. (P.S.: When we finished up, he asked to ride his bike outside. I was sitting at the dining room table, and after a few minutes I heard his talking while riding his bike on the sidewalk underneath the window, which is built on a gradual slope all the kids have struggled with on their bikes. He was chanting, "Don't stop, don't stop" to himself as he pushed with all his might to make it up the slope on his own. Cool kid.)

B: "B.R. Case."
C: "What grade are you going to be in?"
B: "First. I mean, second." (second)
C: "What is your favorite food?"
B: "Hamburgers."
C: "What do you like on your hamburgers?"
B: "Ketchup and mustard."
C: "No cheese?"
B: "No cheese."
C: "What's the best thing we've done this summer?"
B: "Hm.
C: "What is your favorite thing about your brother J?"
B: "He never tries to bug me when I'm reading a book."
C: (laughs)
B, defensively: "What?!"
C: "I just think that's a really good answer. It made me laugh...So what's your favorite book?"
B: "Hero Factory." (This is disappointing to me, but he is seven.)
C: "What is your favorite thing to do? Like if you had a day free, what would you do?"
B: "I would play video games all day because we don't have any video games."
C: "What's your favorite thing about your sister?"
B: "She likes Batman better than unicorns." (This is perhaps not factually accurate, though she does like Batman a lot.)
C: "So what's your favorite thing about H?"
B: "Like when I'm drawing a picture, he doesn't mess it up."
C: "What thing do you think you do best?"
B: "Read well."
C: "What is one thing you think you could work on?" (I had to explain this one a few times for clarity.)
B: "Not hurting H when I'm frustrated." (This surprised me, since it's just not true. B and H are best brother friends.)
C: "What's your favorite thing to play outside?"
B: "Soccer."
C: "Okay. When you grow up, what book would you like to write? Or you could tell me what it's about."
B: "Bats, non-fiction books, about how they live and what they eat and how many types of bats there are. I think that's it."
C: "If you could have a pet, what would it be and what would you name it?"
B: "I would have a dog; I would name it Scruffy. He would be a Golden Retriever 'cause Golden Retrievers, if you throw a stick, they fetch it, and that's why they're called retrievers."
(bathroom break)
B: "Another question you could ask is if you could make yourself into any dessert, what would it be."
C: "Okay. If you could be any dessert, what would it be?"
B: "Chocolate chip cookies."
C: "Okay. Two more questions. What's your favorite video game to play at Ta and Pa's?" (his grandparents, my parents)
B: "It would be Mario Cart on the Wii."
C: "Last question. What is the best thing you've done so far this summer?"
B: "Ride my bicycle without training wheels."
That's a wrap! What a cool kid. (P.S.: When we finished up, he asked to ride his bike outside. I was sitting at the dining room table, and after a few minutes I heard his talking while riding his bike on the sidewalk underneath the window, which is built on a gradual slope all the kids have struggled with on their bikes. He was chanting, "Don't stop, don't stop" to himself as he pushed with all his might to make it up the slope on his own. Cool kid.)
Friday, June 13, 2014
The Kitchen: The Plan
I'd like to share my kitchen vision in this post to give you an idea of what we're planning on doing. The best I can do is show you a bunch of photos I found via Pinterest that include disparate elements of what I like. You should know that I have been planning and scheming and dreaming about this kitchen for years--several years--and that definite planning began in earnest over two years ago. So I have a tremendously firm grasp of what I do and don't want, and it's changed somewhat with time.
If you've been around the blog any amount of time (and have been paying attention), then you'll remember my feverishly excited post from nearly three years ago. I had found a picture and I was in love:
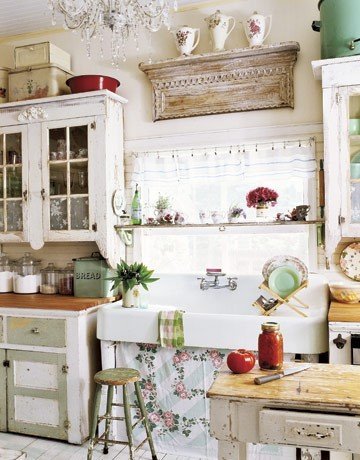
I had also found a huge antique cast iron sink, and thus my love for antique sinks was, if not realized (as I have a couple in the house already), fully bloomed. When we began planning and measuring our kitchen in earnest, we had to come to grips with the fact that our bargain antique sink was too large for the space. It's a full five feet across, and considering that I was going to have only eight feet of total countertop on the sink side of the kitchen, I couldn't justify a five foot sink. It's still sitting in our basement, and I have high hopes of using it in our laundry room someday.
I still love the look of a random, flea-market-find kitchen, but I also realized that it wasn't very practical for a kitchen like ours that is low on space and in desperate need of efficient cabinet design for maximum storage. What I retained from that original picture was a white cast iron sink, butcher block countertops, and pops of Jadeite and other mint-colored items. (I already slowly collect Jadeite pieces--score!)
As far as flooring went, I knew I wanted a black-and-white tiled floor on a larger scale than our upstairs bathroom. (The majority of our downstairs flooring is hardwood, but we've tiled the downstairs bath and entryway with period black-and-white floor tiles, too, and so I like to keep the black-and-white theme going where there isn't hardwood. I didn't like the idea of doing hardwood in the kitchen since it sits at a right angle to the hardwood in the dining room and would be difficult to match to the original oak.) This picture is a good idea of what I was going for:
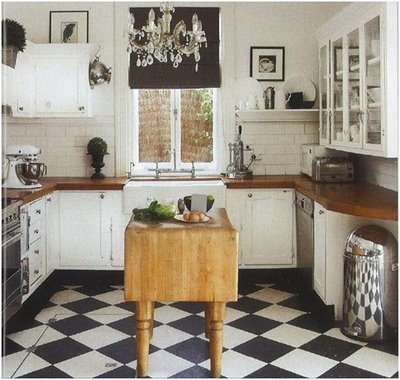
The tile is set on the diagonal and everything! There's a farm sink with a deep apron! White cabinets! Now we're getting somewhere.
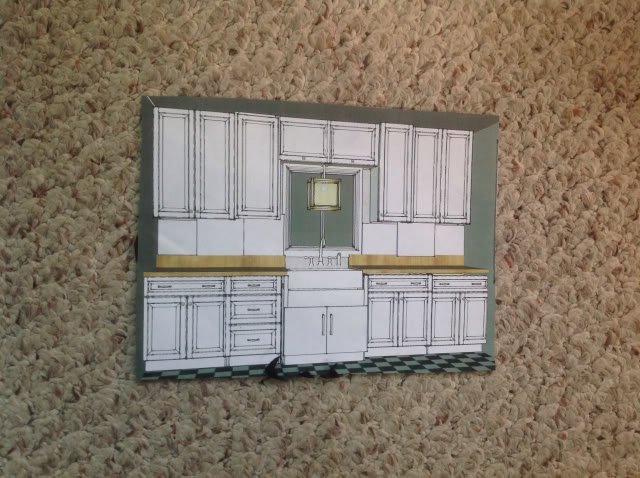
Here is a (fuzzy) picture of her design. Sink side of the kitchen on the left, appliance side of the kitchen on the right:
I have too many kids calling for my attention while I blog to make that picture any better.
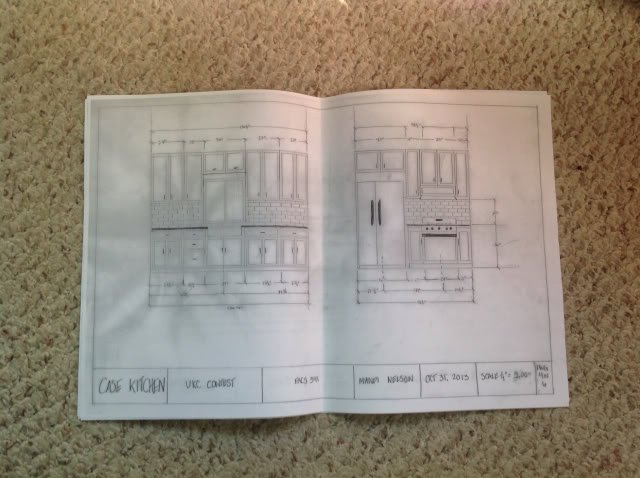
And here's a more complete draw-up she did for her final presentation of my space:
Out of all the other design students, her design won the contest! The department chair said that the judging committee liked the design for its simplicity and timelessness. Boom.
Now, my final design doesn't include everything she suggested here. I'm not even using the same cabinets she was using for her dimensions. But her drawings give you a decent idea of what we were wanting to do. One big difference between the original kitchen and the new plan was that we wanted to move the range to the same side of the kitchen as the fridge. This opened up the sink side for nearly eight feet of counter space, where I had originally had maybe three. Whoa.
With a firm design in place, I was able to move forward, confident that my ideas were sound. I waded into the world that is Ikea kitchen design (oh my word, it's a crazy world), agonized over configurations and measurements for months, pulled the trigger in late March, and the rest is history. As I type this right now, my husband and father-in-law are getting the upper cabinets hung, which makes me insanely excited.
Thanks for letting me ramble so much about KITCHEN DESIGN. It's something near and dear to my heart, and I think that even after I have my dream kitchen, I'm still going to be excited by kitchens.
Next time I post, I'll take a break from kitchens and just do a funny kid story or something. Promise.
If you've been around the blog any amount of time (and have been paying attention), then you'll remember my feverishly excited post from nearly three years ago. I had found a picture and I was in love:

I had also found a huge antique cast iron sink, and thus my love for antique sinks was, if not realized (as I have a couple in the house already), fully bloomed. When we began planning and measuring our kitchen in earnest, we had to come to grips with the fact that our bargain antique sink was too large for the space.
I still love the look of a random, flea-market-find kitchen, but I also realized that it wasn't very practical for a kitchen like ours that is low on space and in desperate need of efficient cabinet design for maximum storage. What I retained from that original picture was a white cast iron sink, butcher block countertops, and pops of Jadeite and other mint-colored items. (I already slowly collect Jadeite pieces--score!)
As far as flooring went, I knew I wanted a black-and-white tiled floor on a larger scale than our upstairs bathroom. (The majority of our downstairs flooring is hardwood, but we've tiled the downstairs bath and entryway with period black-and-white floor tiles, too, and so I like to keep the black-and-white theme going where there isn't hardwood. I didn't like the idea of doing hardwood in the kitchen since it sits at a right angle to the hardwood in the dining room and would be difficult to match to the original oak.) This picture is a good idea of what I was going for:

The tile is set on the diagonal and everything! There's a farm sink with a deep apron! White cabinets! Now we're getting somewhere.
It's hard to tell whether that particular floor is tile or linoleum or painted wood, but you get the idea. I initially had my heart set on true linoleum (Amstrong's line is called Marmoleum), which is eco-friendly and long-lasting and antimicrobial and just in general a magic material.
And note: It is NOT the same thing as vinyl. Vinyl = petroleum based. Linoleum = natural materials based, mainly linseed, thus the name. Linoleum pre-dated vinyl and was only eclipsed by vinyl because anything petroleum-based is cheaper. Large-scale places like hospitals and schools very often still use linoleum flooring because of the clean factor. Consider yourself educated. I wasn't when I began this process, but now I am, and I will never tire of lecturing people who don't really know what linoleum is. Those people include nearly all the local flooring store employees in town. It's insane.
Anyway, I had to finally admit that linoleum was out of my budget. It runs around the same price as marble, plus underlayment, and I couldn't justify $700+ for a 92 square foot kitchen. So then I discovered VCT, also made by Armstrong, which is vinyl (sorry, environment) that mimics linoleum and runs $.69 a square foot. Boom. Suddenly my flooring was both awesome AND affordable. Imagine.
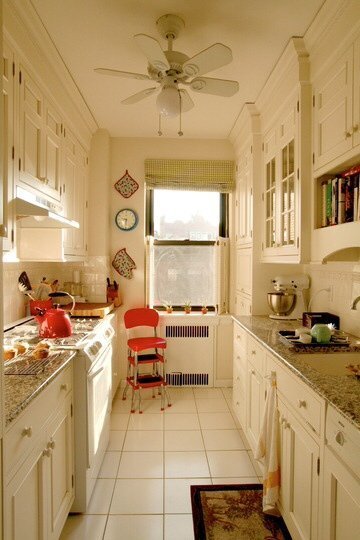
Here is a picture of a white galley kitchen that gave me hope. It's not exactly the look I'm going for, but it's pretty hard to find pictures of galley kitchens because apparently everyone else in the world (ha) owns a large open kitchen with professional appliances (ha) and islands. No one lives in old homes? Really? Everyone can expand or knock down walls? (We couldn't really do that even if we wanted to. Our kitchen sits squarely in between our property line and a staircase.) Hmm. So it's just me with a bowling alley for a kitchen? Okay, then.

I tell you, it gave me hope.
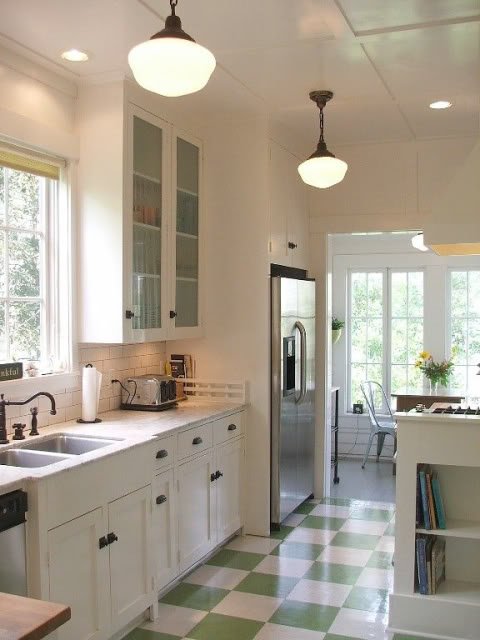
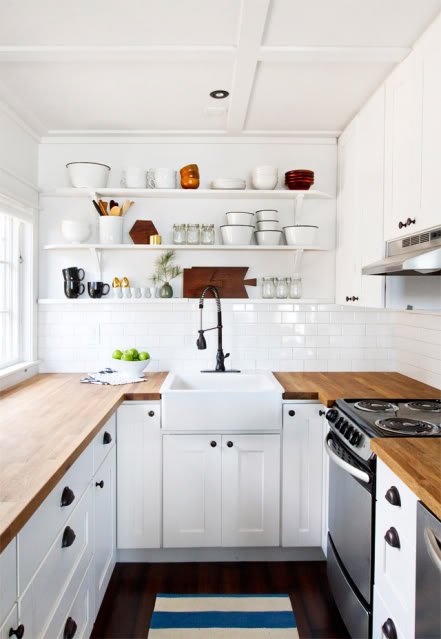
This next picture is from a neat home you can rent in Galveston. I loved the floor, the white to-the-ceiling cabinets, the schoolhouse fixtures, and the white subway tile with dark gray grout. It's simultaneously on-trend and traditional, and I can't afford to have a kitchen that is going to be outdated in 5 years. This kitchen just works.

This next kitchen is really popular in Internet-land, for good reason. This gal has taken a small space and made it lovely and functional and beautiful, while taking popular elements, like open shelving and an ORB faucet, and married it with traditional white cabinetry, the white sink, white subway tile, butcher block, and real-life appliances in a real-life space. She's a genius. And her cabinets are an almost identical look to our chosen cabinets, which makes me feel like a genius by proxy.

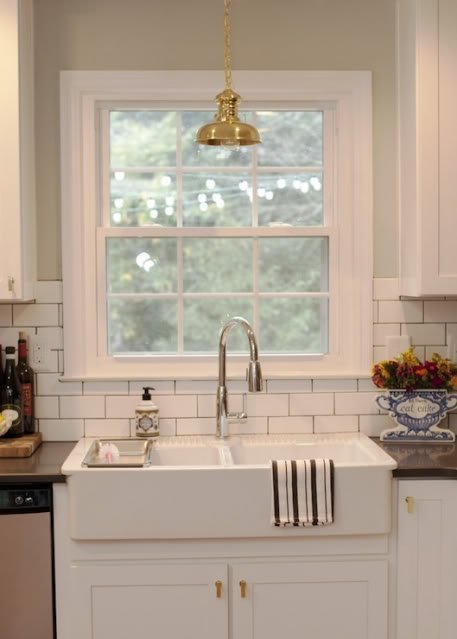
The sink in that photo is Ikea's Domsjo single-bowl sink, which, if you share my love affair with farm sinks and have done any measure of research, you will recognize is the most affordable option on the market while also being well-made and beautiful. We are opting out of a dishwasher in our kitchen (don't want it, don't need it, can't really justify the space it would take), so I decided to go with the larger double-bowl Domsjo, for maximum dish-washing potential, which you can see in action in this photo:

The sink! The cabinetry! The countertop! The tile! This homeowner might be my soulmate.
So those are my inspiration photos. I had all that inspiration firmly lodged in my brain last fall when I took part in a contest the housing design department at my alma mater does every year. Each year the senior design students do an Ugly Kitchen Contest, and the head of the department puts out a call for staff and faculty with truly ugly kitchens who would like free design done by senior design students. It's a win-win for everyone! We signed up this year, and I got hooked up with a truly awesome student who took my vision and ran with it.
Here is a (fuzzy) picture of her design. Sink side of the kitchen on the left, appliance side of the kitchen on the right:

I have too many kids calling for my attention while I blog to make that picture any better.
And here's a more complete draw-up she did for her final presentation of my space:

Out of all the other design students, her design won the contest! The department chair said that the judging committee liked the design for its simplicity and timelessness. Boom.
Now, my final design doesn't include everything she suggested here. I'm not even using the same cabinets she was using for her dimensions. But her drawings give you a decent idea of what we were wanting to do. One big difference between the original kitchen and the new plan was that we wanted to move the range to the same side of the kitchen as the fridge. This opened up the sink side for nearly eight feet of counter space, where I had originally had maybe three. Whoa.
With a firm design in place, I was able to move forward, confident that my ideas were sound. I waded into the world that is Ikea kitchen design (oh my word, it's a crazy world), agonized over configurations and measurements for months, pulled the trigger in late March, and the rest is history. As I type this right now, my husband and father-in-law are getting the upper cabinets hung, which makes me insanely excited.
Thanks for letting me ramble so much about KITCHEN DESIGN. It's something near and dear to my heart, and I think that even after I have my dream kitchen, I'm still going to be excited by kitchens.
Next time I post, I'll take a break from kitchens and just do a funny kid story or something. Promise.
Tuesday, June 10, 2014
The Kitchen: Why We Are Putting Ourselves Through This
So we've embarked on a major renovation project, and really it doesn't get much more major.
We are redoing our kitchen.
This is, of course, cause for celebration and joyous whooping and energetic high-fives, but it is also the time for chastened solemnity and quiet consideration because, you guys, a kitchen renovation might eat your soul and steal your humanity. I say that without an ounce of hyperbole. Renovating your kitchen might twist you into something that is somehow not human.
Now when I say "kitchen renovation," I mean imagine how intense it can possibly get without having to actually knock down walls, and you'll perhaps have an idea of what we're dealing with. And I OF COURSE realize that this is a first-world problem that I have on my hands. I have a wonderful home. I had a working (albeit desolate and poorly executed and perhaps ready to kill me in my sleep) kitchen to begin with that had been in constant use for nearly 70 years. I have the money and time and inclination to knock it all out and start from scratch. Let's just get this out of the way: I realize any complaints I might make are the complaints of the privileged.
Every time I get a little whiny, a little voice in my head whispers faintly, Please remember that you spent nearly $4,000 on new cabinetry. And also shut up about the plaster dust.
So I realize that I am speaking from a very lofty place. But I also realized many years ago that to get our kitchen, which is, in a completely undramatic way, very much the heart and soul of our house, up to scratch, we were going to have to someday spend a wad of money to gut it and start all over.
"Up to scratch" meant cabinetry that wasn't falling apart into piles of sawdust, flooring that wasn't asbestos-based and four layers deep, storage that actually filled all of the available space for storage (imagine! who would have thought that efficiency in design would be possible!), more than one workspace outlet, and just, in general, a space that didn't make me want to weep with sorrow. Privileged sorrow, but still: sorrow.
If you're at all inclined to peruse magazine or blog or website articles about house transformations, I'm sure you've run across multiple stories about how a family turned their kitchen around for "less than $1,000!!" or "just with paint!!" or somesuch magic. And when people gut their perfectly functional 90s kitchens whose only fault is cabinetry in the wrong color, I do tend to grind my teeth a little. (Gaze upon me up here on my high horse!) I would KILL or maybe just maim for that kitchen that only needs maybe some paint and a new faucet, and I've seen people do some ingenius, beautiful things to better their spaces for not much cash. Kudos to those folks.
But we cannot be those folks, because that is not our home. When we bought this house, we bought it in large part for its potential. We have slowly saved up and made major improvements that have, in many ways, greatly transformed both its looks and functionality while still trying to preserve its post-World War II bones. It's a cool house with plaster walls and original woodwork and arched doorways and hardwood floors, but it looked terrible, and I just mean TERRIBLE, when we moved in six years ago. For some review, see my letter to Mrs. Dorothy.
We've since done steady and sometimes major renovation, including total guttings of both bathrooms, all-new windows (except the sunroom! darn you, sunroom), tearing up carpet and restoring the hardwood underneath, all-new siding and trim and whatnot, some window reconstruction for more sensible living (like in our bedroom), and then also minor updates like paint, new lighting, updating outlets and covers and switchplates, and the like.
We have pretty much worked steadily and as cash allowed for six years, but the kitchen just sat, looking fairly terrible (I'll get to pictures soon, I promise) and neglected because, seriously? No amount of paint was going to help. I was fairly certain the cabinets wouldn't even TAKE paint, the varnish was so bad, and I didn't see much point in spending money and energy on painting something I was going to completely rip out ASAP. In short, the bathrooms and the kitchen, some of the most important and telling spaces in one's home, absolutely had to be ripped bare in our home in order to start from scratch and become functional, safe, and updated.
My husband tells me he and his dad found extension cord in the wiring in the walls in the upstairs bathroom. Do you see what I mean?
Anyway, now that I have used up all that Internet space yammering on about the WHY, let me give you some pictorial evidence. This is what our kitchen looked like when we moved in. The mini-blinds and valances were gifts from Mrs. Dorthy.
I guess I should maybe explain the layout, too. You enter the kitchen via a wide-ish arched doorway in the dining room. The kitchen itself is a galley, and of course galleys, while potentially wonderful when designed well, are teeny and hellish when designed poorly. Ours had the original 1948 cabinetry on only one side. Presumably the homeowners did this to save money OR because removable cabinets, like Hoosier cabinets, were still popular OR a combination of both. Whatever the reason, we were dealing with falling-apart cabinetry that didn't take up all useable space on one side and a blank spot on the other. We filled that blank spot with our fridge and a baker's rack.
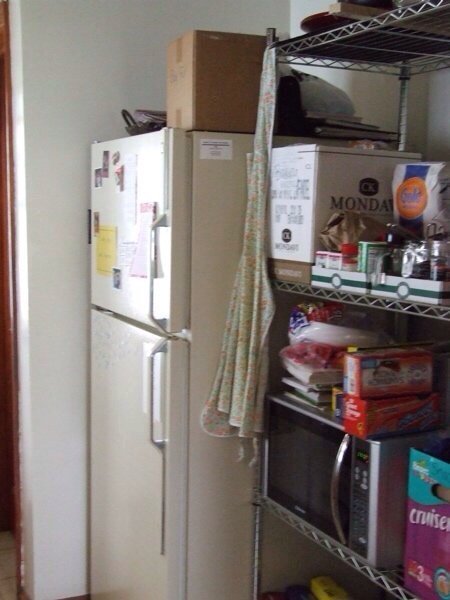
The baker's rack was a source of much gnashing of teeth for me, since it meant all my business was on display at all times. I mean, look at all that glorious food! And utensils for a KitchenAid mixer! And a microwave that instantly cooks food! Gah. What a drag to own all that awesome stuff and have it be known to everyone.
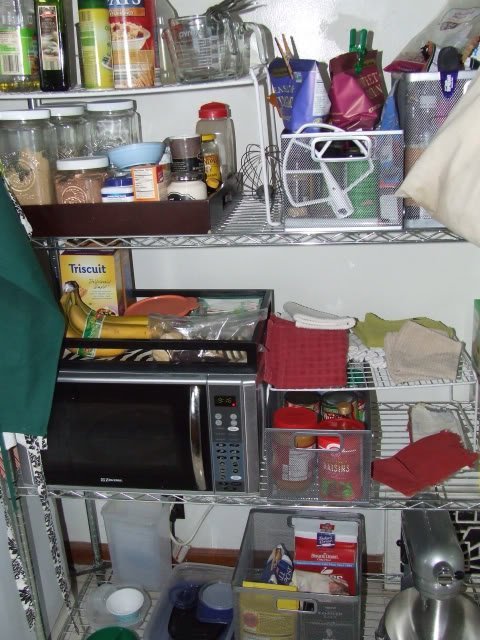
Back to the cabinet side. The original windows had long broken, and I had since adjusted to the heat of windows face both west and south in a room where windows didn't open and I had no stove vent. (Answer: Die from heat. The end.) The windows on the cabinet side also took up precious square footage with their width, and they were really set up so high that even if I HAD been able to open them, I would have had to climb on the sink to do it.
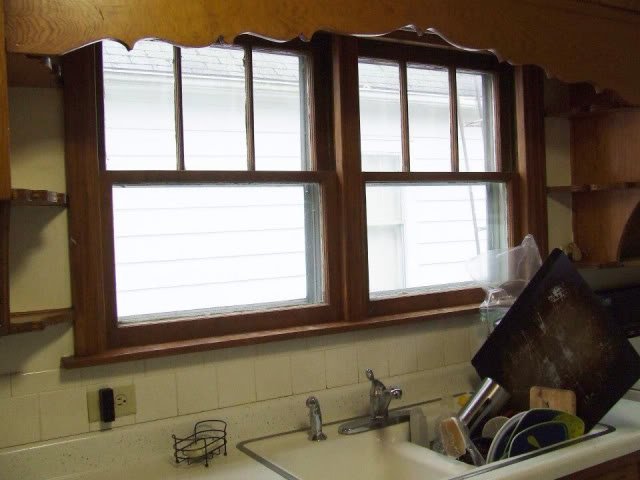
As detailed extensively in this post, part of our siding project almost 2 years ago included ripping out those old windows and replacing them with one narrower-but-taller casement window that actually opened (AMAZING) and gave us several more inches on either side for potential future cabinetry. Since this window gives me the glorious view of our neighbors' house, I didn't feel like I needed as wide a window as before. I have been so happy with it and am so glad we were able to make this small step when we did. For two years I've had fresh air in the kitchen! And bare drywall, but hey, progress is progress, even if it's incredibly slow.
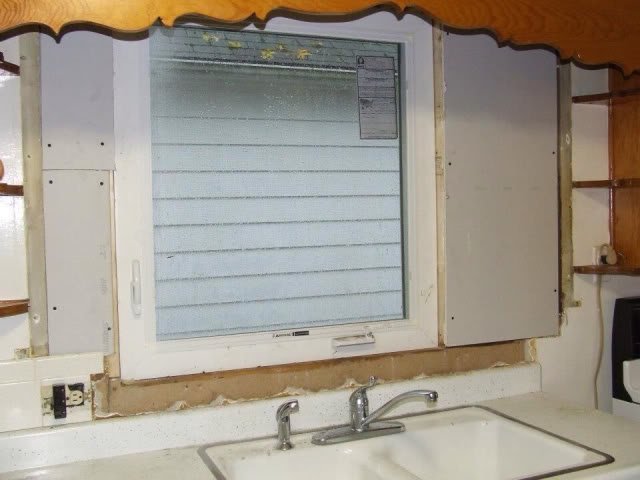
How about that overhang, though?! When The Professor was demo-ing this room, he had a little celebration when he ripped that bad boy down. We hated it so.
Here is a closer shot of my gold-flecked laminate countertop. So vintage. And honestly, it never really puked me out, looks-wise; it's just so dang hard to keep clean! People who choose white countertops: You be trippin'.
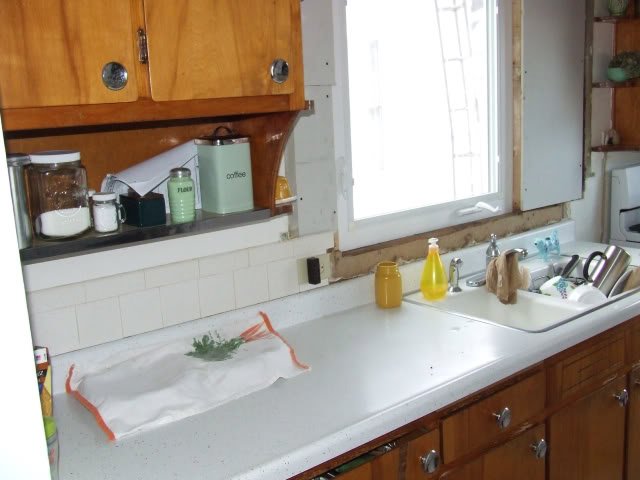
Note in the above shot the appearance of my one sole outlet available for countertop appliances. Only one side of the outlet actually worked regularly.
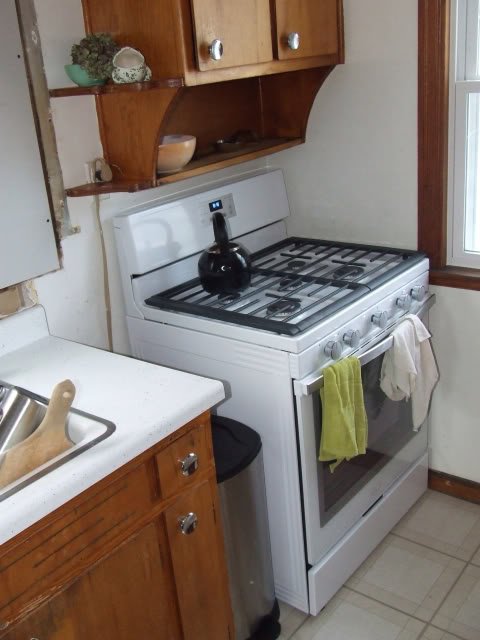
Last fall I was able to buy a new range with money I earned as an actual grown-up teaching college writing classes. (The vintage range I showed you here ended up being a complete and total lemon, according to the sweet repairman who very gamely agreed to give it a shot. Alas, alas!) I settled on the Whirlpool White Ice gas range, although it appears that in the six months since I bought it, they've dropped my model. (Mine has as little stainless as possible, while what I linked to has stainless all along the backsplash. I do not think stainless is God's Answer to the Kitchen. I think white is a much more timeless look for appliances.) I'd recommend this model highly. It has the largest window on the market, meaning from the front you see very little color and a lot more oven, and it cooks evenly and quickly. We have had a problem with the starter in the oven portion, but our local dealer we bought it from has been quick to fix it and it's under manufacturer warranty.
As you can see from the above shot, modern standard 30 inch ranges are too small for the provided space in my kitchen, meaning lots of crud and dust collecting on either side. Plus the range butts up against the rather low sill on the west window, another kitchen foible that makes me ragey. You can also spy the stick-on vinyl that had been applied sometime in the last 20 years...on top of many more layers. But more on the floor in a future post. I've probably said enough for today.
That's my kitchen as it WAS, and even as I type this, it has changed drastically and for the better. Hurrah! We're still many days away from completion, but it's nice to look on these pictures and offer up the contented thought, At least I don't have to cut my hand on the strangely vicious shutting mechanism of the cabinets anymore.
It's the little things.
We are redoing our kitchen.
This is, of course, cause for celebration and joyous whooping and energetic high-fives, but it is also the time for chastened solemnity and quiet consideration because, you guys, a kitchen renovation might eat your soul and steal your humanity. I say that without an ounce of hyperbole. Renovating your kitchen might twist you into something that is somehow not human.
Now when I say "kitchen renovation," I mean imagine how intense it can possibly get without having to actually knock down walls, and you'll perhaps have an idea of what we're dealing with. And I OF COURSE realize that this is a first-world problem that I have on my hands. I have a wonderful home. I had a working (albeit desolate and poorly executed and perhaps ready to kill me in my sleep) kitchen to begin with that had been in constant use for nearly 70 years. I have the money and time and inclination to knock it all out and start from scratch. Let's just get this out of the way: I realize any complaints I might make are the complaints of the privileged.
Every time I get a little whiny, a little voice in my head whispers faintly, Please remember that you spent nearly $4,000 on new cabinetry. And also shut up about the plaster dust.
So I realize that I am speaking from a very lofty place. But I also realized many years ago that to get our kitchen, which is, in a completely undramatic way, very much the heart and soul of our house, up to scratch, we were going to have to someday spend a wad of money to gut it and start all over.
"Up to scratch" meant cabinetry that wasn't falling apart into piles of sawdust, flooring that wasn't asbestos-based and four layers deep, storage that actually filled all of the available space for storage (imagine! who would have thought that efficiency in design would be possible!), more than one workspace outlet, and just, in general, a space that didn't make me want to weep with sorrow. Privileged sorrow, but still: sorrow.
If you're at all inclined to peruse magazine or blog or website articles about house transformations, I'm sure you've run across multiple stories about how a family turned their kitchen around for "less than $1,000!!" or "just with paint!!" or somesuch magic. And when people gut their perfectly functional 90s kitchens whose only fault is cabinetry in the wrong color, I do tend to grind my teeth a little. (Gaze upon me up here on my high horse!) I would KILL or maybe just maim for that kitchen that only needs maybe some paint and a new faucet, and I've seen people do some ingenius, beautiful things to better their spaces for not much cash. Kudos to those folks.
But we cannot be those folks, because that is not our home. When we bought this house, we bought it in large part for its potential. We have slowly saved up and made major improvements that have, in many ways, greatly transformed both its looks and functionality while still trying to preserve its post-World War II bones. It's a cool house with plaster walls and original woodwork and arched doorways and hardwood floors, but it looked terrible, and I just mean TERRIBLE, when we moved in six years ago. For some review, see my letter to Mrs. Dorothy.
We've since done steady and sometimes major renovation, including total guttings of both bathrooms, all-new windows (except the sunroom! darn you, sunroom), tearing up carpet and restoring the hardwood underneath, all-new siding and trim and whatnot, some window reconstruction for more sensible living (like in our bedroom), and then also minor updates like paint, new lighting, updating outlets and covers and switchplates, and the like.
We have pretty much worked steadily and as cash allowed for six years, but the kitchen just sat, looking fairly terrible (I'll get to pictures soon, I promise) and neglected because, seriously? No amount of paint was going to help. I was fairly certain the cabinets wouldn't even TAKE paint, the varnish was so bad, and I didn't see much point in spending money and energy on painting something I was going to completely rip out ASAP. In short, the bathrooms and the kitchen, some of the most important and telling spaces in one's home, absolutely had to be ripped bare in our home in order to start from scratch and become functional, safe, and updated.
My husband tells me he and his dad found extension cord in the wiring in the walls in the upstairs bathroom. Do you see what I mean?
Anyway, now that I have used up all that Internet space yammering on about the WHY, let me give you some pictorial evidence. This is what our kitchen looked like when we moved in. The mini-blinds and valances were gifts from Mrs. Dorthy.

I guess I should maybe explain the layout, too. You enter the kitchen via a wide-ish arched doorway in the dining room. The kitchen itself is a galley, and of course galleys, while potentially wonderful when designed well, are teeny and hellish when designed poorly. Ours had the original 1948 cabinetry on only one side. Presumably the homeowners did this to save money OR because removable cabinets, like Hoosier cabinets, were still popular OR a combination of both. Whatever the reason, we were dealing with falling-apart cabinetry that didn't take up all useable space on one side and a blank spot on the other. We filled that blank spot with our fridge and a baker's rack.

The baker's rack was a source of much gnashing of teeth for me, since it meant all my business was on display at all times. I mean, look at all that glorious food! And utensils for a KitchenAid mixer! And a microwave that instantly cooks food! Gah. What a drag to own all that awesome stuff and have it be known to everyone.

Back to the cabinet side. The original windows had long broken, and I had since adjusted to the heat of windows face both west and south in a room where windows didn't open and I had no stove vent. (Answer: Die from heat. The end.) The windows on the cabinet side also took up precious square footage with their width, and they were really set up so high that even if I HAD been able to open them, I would have had to climb on the sink to do it.

As detailed extensively in this post, part of our siding project almost 2 years ago included ripping out those old windows and replacing them with one narrower-but-taller casement window that actually opened (AMAZING) and gave us several more inches on either side for potential future cabinetry. Since this window gives me the glorious view of our neighbors' house, I didn't feel like I needed as wide a window as before. I have been so happy with it and am so glad we were able to make this small step when we did. For two years I've had fresh air in the kitchen! And bare drywall, but hey, progress is progress, even if it's incredibly slow.

How about that overhang, though?! When The Professor was demo-ing this room, he had a little celebration when he ripped that bad boy down. We hated it so.
Here is a closer shot of my gold-flecked laminate countertop. So vintage. And honestly, it never really puked me out, looks-wise; it's just so dang hard to keep clean! People who choose white countertops: You be trippin'.

Note in the above shot the appearance of my one sole outlet available for countertop appliances. Only one side of the outlet actually worked regularly.

Last fall I was able to buy a new range with money I earned as an actual grown-up teaching college writing classes. (The vintage range I showed you here ended up being a complete and total lemon, according to the sweet repairman who very gamely agreed to give it a shot. Alas, alas!) I settled on the Whirlpool White Ice gas range, although it appears that in the six months since I bought it, they've dropped my model. (Mine has as little stainless as possible, while what I linked to has stainless all along the backsplash. I do not think stainless is God's Answer to the Kitchen. I think white is a much more timeless look for appliances.) I'd recommend this model highly. It has the largest window on the market, meaning from the front you see very little color and a lot more oven, and it cooks evenly and quickly. We have had a problem with the starter in the oven portion, but our local dealer we bought it from has been quick to fix it and it's under manufacturer warranty.
As you can see from the above shot, modern standard 30 inch ranges are too small for the provided space in my kitchen, meaning lots of crud and dust collecting on either side. Plus the range butts up against the rather low sill on the west window, another kitchen foible that makes me ragey. You can also spy the stick-on vinyl that had been applied sometime in the last 20 years...on top of many more layers. But more on the floor in a future post. I've probably said enough for today.
That's my kitchen as it WAS, and even as I type this, it has changed drastically and for the better. Hurrah! We're still many days away from completion, but it's nice to look on these pictures and offer up the contented thought, At least I don't have to cut my hand on the strangely vicious shutting mechanism of the cabinets anymore.
It's the little things.
Tuesday, June 3, 2014
Paradise
I realize I haven't checked in here lately, and since we're currently in the thick of a major remodeling job that I'd like to document here, I thought I should mayyyybe give ye olde blog another go. This summer will be 6 years since I started a family blog, and I'm definitely feeling the difficulty of finding creative content in the face of a) rampant micro-blogging (Twitter, Instagram, even Facebook, etc.) and b) my children growing up. They are their own people, so while I have no problem poking fun at them when they are stupid (kids are pretty stupid, Lord love them), I don't know how much freedom I have to tell their personal stories.
Anyway. That seems rather esoteric. Let's get down to the nitty-gritty. Before I launch into any posts about Our Life Coated in Plaster Dust, let me fill you in on this past semester. (Both The Professor and I have been thinking in terms of semesters since we were five, and because we are petulant and adverse to chance, we've gone into academia in order to retain that mindset. Please adapt.)
Last fall I taught two classes in the English department at my alma mater (surreal, y'all), and this past spring I scaled back to one. It was College Writing I and it is generally inhabited by only freshmen, and I soon came to an important conclusion: I love college freshmen. I LOVE them. It is an irrational love, since they can be some of the most maddening creatures in creation, but I will say this in their defense: they are also some of the most awesome, and I am so thankful I had a very teeny part in the beginning of their college experience. I hope I had a very large part in the beginning of their college writing experience, and I also hope they don't think I am too much of a crazy liberal heretic. Amen.
I'm all signed up to teach two sections of freshman writing again both this coming fall and spring, so I think I did all right. I'm really glad for summer break, but I'm also really glad for this teaching opportunity. Imagine! Me! Getting up and putting on makeup and teaching young adults! What in the heck has come over me? Is it something in the water?
The Professor spent the entire academic year writing his dissertation, and he rounded it up with three weeks of research in Austin at the Harry Ransom Center at UT. That was a crazy time. I visited him for a long weekend, and then he came home and we settled into normality again. Then after another month he left for a week in Germany, AS YOU DO. Just before Germany we started our big remodel, which will take up a good portion of our summer. He is scheduled to defend his dissertation mid-July, officially making him Dr. Case, and then, after our family summer vacation, he'll start back at Olivet full-time teaching in mid-August.
Basically, I do not understand how he's not flat on the floor, dead. I suspect he's a robot.
In the middle of all that, our kids grew and flourished and learned and, you know, LIVED, and we managed to get a decent photo on Mother's Day:

It was a Mother's Day miracle.
In case you're wondering: King Peter the Boy is 5.5, H is 2.5, and J and B are both (duh) 7.
In just two days the older three finish up the school year, and then I will officially have two smartass 2nd grade boys, one hyper-extrovert 1st grade girl, and an almost-three year old on my hands. Sometimes they are almost too much for me to handle and I want to run screaming from my own home, escaping into the corn fields forever. (Question: What would I do in the corn fields? Answer: Cherish the silence.) But most of the time they are bewilderingly amazing and I would like to high-five the universe for making me their mom.
Between times I am handing out graham crackers in an effort to just get everyone to shut up for five freaking minutes, for the love.

So that's my quick check-in to Blogland. Hope it wasn't too whirl-wind for you. Life is pretty grand for us. Fun and healthy and free of drama beyond the normal, life-with-kids kind. We go to church, we go to school, we work in our garden, we try to serve our community, we gather with friends and family, and we work everyday to create a little paradise here on Earth in our very home.
And when I look down and realize that my two-year-old son is bossing the life out of me, I realize that karma has come full-circle and that I am only experiencing the effects of a life of bossing everyone else around me.

Also amen.
Subscribe to:
Posts (Atom)